Category Archives: Dell

Extend a raidset with STORCLI CLI

You can use this command to see the status of the Raid Controller and Raidset.

storcli /c0 show
Generating detailed summary of the adapter, it may take a while to complete.

Controller = 0
Status = Success
Description = None

Product Name = Intel(R) RAID Controller RS3DC080
Serial Number = SK94678290
SAS Address =  500605b00f7ef7e0
PCI Address = 00:b5:00:00
System Time = 03/18/2022 15:44:57
Mfg. Date = 11/24/19
Controller Time = 03/18/2022 15:44:29
FW Package Build = 24.21.0-0126
BIOS Version = 6.36.00.3_4.19.08.00_0x06180203
FW Version = 4.680.00-8519
Driver Name = lsi-mr3
Driver Version = 7.702.13.00
Current Personality = RAID-Mode
Vendor Id = 0x1000
Device Id = 0x5D
SubVendor Id = 0x8086
SubDevice Id = 0x9360
Host Interface = PCI-E
Device Interface = SATA-3G
Bus Number = 181
Device Number = 0
Function Number = 0
Drive Groups = 1

TOPOLOGY :
========

-----------------------------------------------------------------------------
DG Arr Row EID:Slot DID Type  State BT       Size PDC  PI SED DS3  FSpace TR
-----------------------------------------------------------------------------
 0 -   -   -        -   RAID5 Optl  N    5.451 TB dflt N  N   dflt N      N
 0 0   -   -        -   RAID5 Optl  N    5.451 TB dflt N  N   dflt N      N
 0 0   0   252:4    8   DRIVE Onln  N  930.390 GB dflt N  N   dflt -      N
 0 0   1   252:5    9   DRIVE Onln  N  930.390 GB dflt N  N   dflt -      N
 0 0   2   252:6    10  DRIVE Onln  N  930.390 GB dflt N  N   dflt -      N
 0 0   3   252:7    11  DRIVE Onln  N  930.390 GB dflt N  N   dflt -      N
 0 0   4   252:0    15  DRIVE Onln  N  930.390 GB dflt N  N   dflt -      N
 0 0   5   252:1    12  DRIVE Onln  N  930.390 GB dflt N  N   dflt -      N
 0 0   6   252:2    13  DRIVE Onln  N  930.390 GB dflt N  N   dflt -      N
-----------------------------------------------------------------------------

DG=Disk Group Index|Arr=Array Index|Row=Row Index|EID=Enclosure Device ID
DID=Device ID|Type=Drive Type|Onln=Online|Rbld=Rebuild|Dgrd=Degraded
Pdgd=Partially degraded|Offln=Offline|BT=Background Task Active
PDC=PD Cache|PI=Protection Info|SED=Self Encrypting Drive|Frgn=Foreign
DS3=Dimmer Switch 3|dflt=Default|Msng=Missing|FSpace=Free Space Present
TR=Transport Ready

Virtual Drives = 1

VD LIST :
=======

-------------------------------------------------------------
DG/VD TYPE  State Access Consist Cache Cac sCC     Size Name
-------------------------------------------------------------
0/0   RAID5 Optl  RW     Yes     RWBD  -   ON  5.451 TB
-------------------------------------------------------------

EID=Enclosure Device ID| VD=Virtual Drive| DG=Drive Group|Rec=Recovery
Cac=CacheCade|OfLn=OffLine|Pdgd=Partially Degraded|Dgrd=Degraded
Optl=Optimal|RO=Read Only|RW=Read Write|HD=Hidden|TRANS=TransportReady|B=Blocked|
Consist=Consistent|R=Read Ahead Always|NR=No Read Ahead|WB=WriteBack|
AWB=Always WriteBack|WT=WriteThrough|C=Cached IO|D=Direct IO|sCC=Scheduled
Check Consistency

Physical Drives = 8

PD LIST :
=======

-------------------------------------------------------------------------------------
EID:Slt DID State DG       Size Intf Med SED PI SeSz Model                   Sp Type
-------------------------------------------------------------------------------------
252:0    15 Onln   0 930.390 GB SATA SSD N   N  512B Samsung SSD 870 QVO 1TB U  -
252:1    12 Onln   0 930.390 GB SATA SSD N   N  512B Samsung SSD 870 QVO 1TB U  -
252:2    13 Onln   0 930.390 GB SATA SSD N   N  512B Samsung SSD 870 QVO 1TB U  -
252:3    14 UGood  - 930.390 GB SATA SSD N   N  512B Samsung SSD 870 QVO 1TB U  -
252:4     8 Onln   0 930.390 GB SATA SSD N   N  512B Samsung SSD 860 EVO 1TB U  -
252:5     9 Onln   0 930.390 GB SATA SSD N   N  512B Samsung SSD 860 EVO 1TB U  -
252:6    10 Onln   0 930.390 GB SATA SSD N   N  512B Samsung SSD 860 EVO 1TB U  -
252:7    11 Onln   0 930.390 GB SATA SSD N   N  512B Samsung SSD 860 EVO 1TB U  -
-------------------------------------------------------------------------------------

EID=Enclosure Device ID|Slt=Slot No.|DID=Device ID|DG=DriveGroup
DHS=Dedicated Hot Spare|UGood=Unconfigured Good|GHS=Global Hotspare
UBad=Unconfigured Bad|Onln=Online|Offln=Offline|Intf=Interface
Med=Media Type|SED=Self Encryptive Drive|PI=Protection Info
SeSz=Sector Size|Sp=Spun|U=Up|D=Down|T=Transition|F=Foreign
UGUnsp=Unsupported|UGShld=UnConfigured shielded|HSPShld=Hotspare shielded
CFShld=Configured shielded|Cpybck=CopyBack|CBShld=Copyback Shielded


Cachevault_Info :
===============

---------------------------------------------------------
Model  State   Temp Mode MfgDate    Next Learn
---------------------------------------------------------
CVPM02 Optimal 23C  -    2020/04/09 2022/03/31  00:41:59
---------------------------------------------------------

Here you can see under PD List, that drive 252:3 14 stand as UGood. Thats the new disk i have put into the server, and have been detected by the raidset.

To include this disk into the array that you see under VD List, you need to do this

 storcli /c0/v0 start migrate type=raid5 option=add drives=252:3

This will add the disk to the raidset. This can takes hours and even days, if you have a big raidset.
You can check the status with this command:

storcli /c0/v0 show migrate
Controller = 0
Status = Success
Description = None


VD Operation Status :
===================

------------------------------------------------------------
VD Operation      Progress% Status      Estimated Time Left
------------------------------------------------------------
 0 Reconstruction         2 In progress 9 Hours 52 Minutes
------------------------------------------------------------

DG=Arrays | Slot=Drive Bay No|VD=Virtual Drive/Logical Drive|EID=Enclosure Device ID

Here you can see that it will take 9 hours and 52 minutes to complete the Reconstruction

When it done with the reconstuction, the command from before will output this:

VD Operation Status :
===================

-----------------------------------------------------------
VD Operation Progress% Status          Estimated Time Left 
-----------------------------------------------------------
 0 Migrate   -         Not in progress -                   
-----------------------------------------------------------

And then you can check the array with the command from the top of this guide

storcli /c0 show

After this you need to change the partition table, and then expand the volume.
New Equallogic warning mail: Free space is below threshold of 15 percent for pool PoolName. Default Snapshot Schedule will run with max-keep set to 1

After an upgrade of our Equallogic SAN to version 8 or later, i get this warning everyday:
Free space is below threshold of 15 percent for pool PoolName. Default Snapshot Schedule will run with max-keep set to 1.

I have 5% left on my SAN, and dosen’t used Snapshot at all on it. It only contain backup data. No needs to take snapshot of Backup data :).
So i turn of this warning message by SSH to the Grp Management IP, and logon with username, grpadmin and my password for this account.

After login I run this command: grpparams default-snapshot-sched disable

This will disabled the schedule running at 00:00, that checks for this 15% free space left.

Useful commands for Dell servers M1000E CMC

Here are some commands that may come in handy for Dell systems.  

Diagnostic log-gathering commands for an M1000e enclosure

  • racadm dumplogs – Hidden command. Useful but VERY verbose logs
  • racadm racdump – Less verbose than dumplogs
  • racadm getsel – Grab the SEL (System Event Log) from the chassis
  • racadm getraclog – Similar to getting syslog output
  • racadm clrsel / clrraclog –  Clear SEL or raclog. They do fill up

To capture the output of these commands, do something like:

ssh mym1000ehostname dumplogs > /tmp/thelogfile

Current M1000e status

  • racadm getmodinfo – Health, presence, service tags of chassis, blades, switches, etc.
  • racadm getmacaddress – Grab MAC addresses for every ethernet interface on the blades and chassis
  • racadm getsensorinfo – Fan speeds, chassis ambient temperature, power supply status
  • racadm getpbinfo / getpminfo – Power status
  • racadm getversion – Get blade iDRAC versions and blade types
  • racadm getversion -c – Get blade CPLD versions
  • racadm getversion -b – Get blade BIOS versions

(Just type “?” for more information and look at the get commands.  These are the ones I use frequently or ones that are very useful yet may not be well-known)

Powerful M1000e commands

  • racadm racreset -m server-12 – Reset the iDRAC on blade 12 from the CMC (safe for the OS).  If the iDRAC is still alive, it can also be done with ipmitool -H remote-idrac.example.com -I lan mc reset cold
  • racadm serveraction -m server-3 powerdown – Hard power off server 3
  • racadm ? serveraction – Get list of other actions to control power to blades
  • racadm serveraction -m server-4 -f reseat – Virtual reseat a blade. Not safe to do with the OS up since it’s the same as suddenly pulling the power plug.  This fixes many problems.
  • racadm serveraction -a powerup – Power up all blades. (Power up is staggered by the CMC)
  • racadm racreset – Reboot the CMC. Safe operation for the blades. Wear ear plugs.
  • racadm chassisaction -m switch-2 reset –  reset switch 2 from the CMC command line.

Change BIOS settings on Dell servers
The Dell Deployment Toolkit can do all sorts of fun things.  The syscfg command queries and changes BIOS settings such as C-states, C1E, turbo mode, virtualization, hyperthreading/SMT, power loss/recovery boot action, boot order, USB port accessibility, memory node interleaving, and much more.

For desktops and laptops, try Dell’s Client Configuration Toolkit (CCTK) which works in Windows and Linux.

There is an unfortunate bug in Dell’s software depending on how you install it.  For us, running dsetchanges /etc/omreg.cfg to something that then breaks syscfg.  Keep a backup copy and change it back after running dset.  I’m sure we can change the installation paths to make it work… Maybe one of these days.

A few examples (changes usually require a reboot):

  • racadm syscfg -h – List all the options for syscfg
  • racadm syscfg -h –somecommandname – Description of a command
  • racadm syscfg –cstates=enable – Enable C-states
  • racadm syscfg –virtualization – Query current virtualization setting
  • racadm syscfg –bootseq=usbfloppy.slot.1,usbcdrom.slot.1,nic.emb.1,hdd.emb.0 – Change bootorder


Source: http://tech.ryancox.net/2010/12/useful-commands-for-dell-servers.html

Install Dell OpenManage on ESXi 5.1 host

If you have follow my guide to install the Dell Openmanage on a ESXi 4.1 host, and try the same thing on a ESXi 5.1 you will get a warning from the host saying:
This operation is NOT supported on 5.1.0 platform.

You need to install it directly on the ESXi host in 5.1 version.
So you just need to upload the Dell OM-SrvAdmin-Dell-Web-7.2.0-6945.VIB-ESX51i.zip file to the host, i will do this with WinSCP, i will put in the /tmp directory.

Then SSH to the host and run this commands:

esxcli software vib install –d /tmp/OM-SrvAdmin-Dell-Web-7.2.0-6945.VIB-ESX51i.zip

Output:

~ # esxcli software vib install -d /tmp/OM-SrvAdmin-Dell-Web-7.2.0-6945.VIB-ESX51i.zip
Installation Result
   Message: The update completed successfully, but the system needs to be rebooted for the changes to be effective.
   Reboot Required: true
   VIBs Installed: Dell_bootbank_OpenManage_7.2-0000
   VIBs Removed:
   VIBs Skipped:

After you have install the VIB packages successfully, the ESXi 5.1 host needs to be restarted. When the host is ready again, you should be able to see that UserVars.CIMvmw_OpenManageProviderEnabled is set to 1. In this location

Select the host and go to the Configuration tab. Click on Advanced Settings and find the UserVars.CIMvmw_OpenManageProviderEnabled, and check that this is set to 1. In ESXi 4.1, this is UserVars.CIMoemProviderEnabled

Vmware ESX 3.5 and Dell openmanage

First you need to install:
http://www.vmware.com/download/download.do?downloadGroup=VI-RCLI-U2

This is a vmware Remote CLI tools. Install it on a windows machine.
After you install remember to log out and the log in, else you will get some error about libxml.dll cannot be found.

Then download Dell Openmanage  to the same machine that you install Vmware Remote CLI:

http://support.dell.com/support/downloads/format.aspx?c=us&cs=04&l=en&s=bsd&deviceid=2331&libid=36&releaseid=R251021&vercnt=3&formatcnt=0&SystemID=PWE_R710&servicetag=&os=LIN4&osl=en&catid=-1&dateid=-1&typeid=-1&formatid=-1&impid=-1&checkFormat=true

Put the Vmware ESX into maintaince mode.

Put tar.gz file  onto the ESX Host, and the untar the file, and then install the Dell Openmanage

tar zxfv OM_6.2.0_ManNode_A00.tar.gz
cd openmanage
sh setup.sh

Make sure that the Dell openmanage is install on the ESX.

Check if the Dell openmanage is started

/opt/dell/srvadmin/dataeng/bin/dataeng status if not then start it: /opt/dell/srvadmin/dataeng/bin/dataeng start (This commands should be run at the ESX host)

Enable SNMP in the firewall:

esxcfg-firewall -e snmpd
esxcfg-firewall –openPort 1311,tcp,in,OpenManageRequest

On the windows machine where you have install Remote CLI goto folder: C:\Programmer\VMware\VMware VI Remote CLI\bin

vicfg-snmp.pl –server <ESX Host> –username root -c appmanager -p 5567 -t 10.105.2.129/appmanager

vicfg-snmp.pl –server <ESX Host> –username root -E

If you need to test the SNMP traps you can run this command

vicfg-snmp.pl –server <ESX Host> –username root -T

Vmware ESXi (ESX) 4.0 and Dell Openmanage SNMP Traps

First you need to install:
http://www.vmware.com/downloads/download.do?downloadGroup=VCLI40U1

This is a vmware CLI tools. Install it on a windows machine.
After you install remember to log out and the log in, else you will get this error:

Can’t load ‘C:/Program Files/VMware/VMware VI Remote CLI/Perl/site/lib/auto/XML/LibXML/Common/Common.dll’ for module XML::LibXML::Common: load_file:The specified module could not be found at C:/Program Files/VMware/VMware VI Remote CLI/Perl/lib/DynaLoader.pm line 230.

Then download Dell Openmanage  offline bundle to the same machine that you install Vmware vsphere CLI:

http://support.dell.com/support/downloads/download.aspx?c=us&cs=04&l=en&s=bsd&releaseid=R250294&SystemID=pwe_r710&servicetag=GWT2J4J&os=EIx4&osl=en&deviceid=21859&devlib=0&typecnt=0&vercnt=1&catid=-1&impid=-1&formatcnt=0&libid=36&typeid=-1&dateid=-1&formatid=-1&source=-1&fileid=365571

Put the Vmware ESXI into maintaince mode.

Start a dos prompt, and go to:

c:\program fileres\vmware\VMware vSphere CLI\bin

Type

vihostupdate.pl –server <IP address of ESXi 4 Host> -i -b <path to Dell OpenManage file>   (On the windows machine)

Reboot the Vmware ESXi machine.

vicfg-advcfg.pl –server <IP address of ESXi 4 Host> –set 1 UserVars.CIMoemProviderEnabled

Reboot the Vmware ESXi machine once again.

Make sure that the Dell openmanage is install on the ESXi.
/usr/lib/ext/dell/dataeng status if not then start it: /usr/lib/ext/dell/dataeng start (This commands should be run at the ESXi host)

vicfg-snmp.pl –server <IP address of ESXi 4 Host> -t <IP address of SNMP Traps destination>/<SNMP community> (On the windows machine)

And this command for enable SNMP Traps
vicfg-snmp.pl –server <IP address of ESXi 4 Host> -E (On the windows machine)

And then this to make Dell Openmanage happy about the SNMP traps configuration.
vicfg-snmp.pl –server <IP address of ESXi 4 Host> -c appmanager

Exit the maintenance mode.

If you need to test the SNMP traps you can run this command

vicfg-snmp.pl –server <IP address of ESXi 4 Host> -T  (On the windows machine)

And if you need to access the openmanage web interface, start Dell openmanage on a windows machine, and then logout (Right corner), and then on the login screen click on “Manage Remote Node”.

Type the ESXi hostname the username is root and the password is the password for root and tick the Ignore Certificate Warnings. Then click login.

Dell openmanage and Nimbus monitoring – SNMP Traps

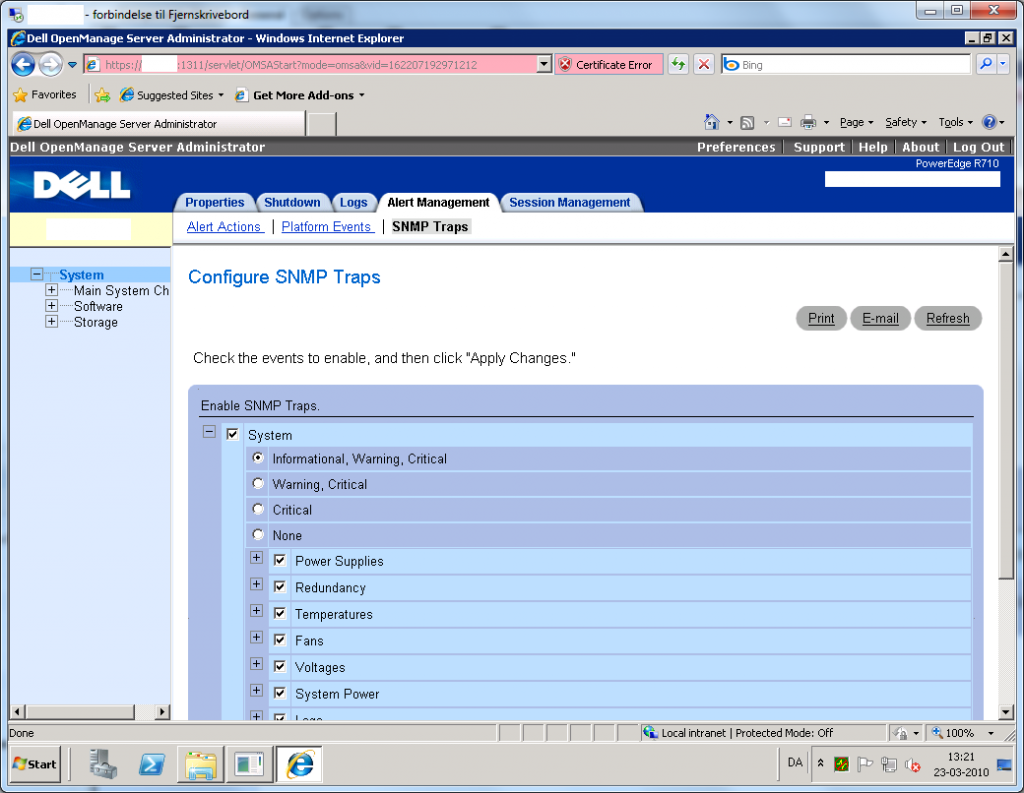
Start Dell openmange.

Goto System -> Alert Management -> SNMP Traps.

Select all the information you want sent to Nimbus

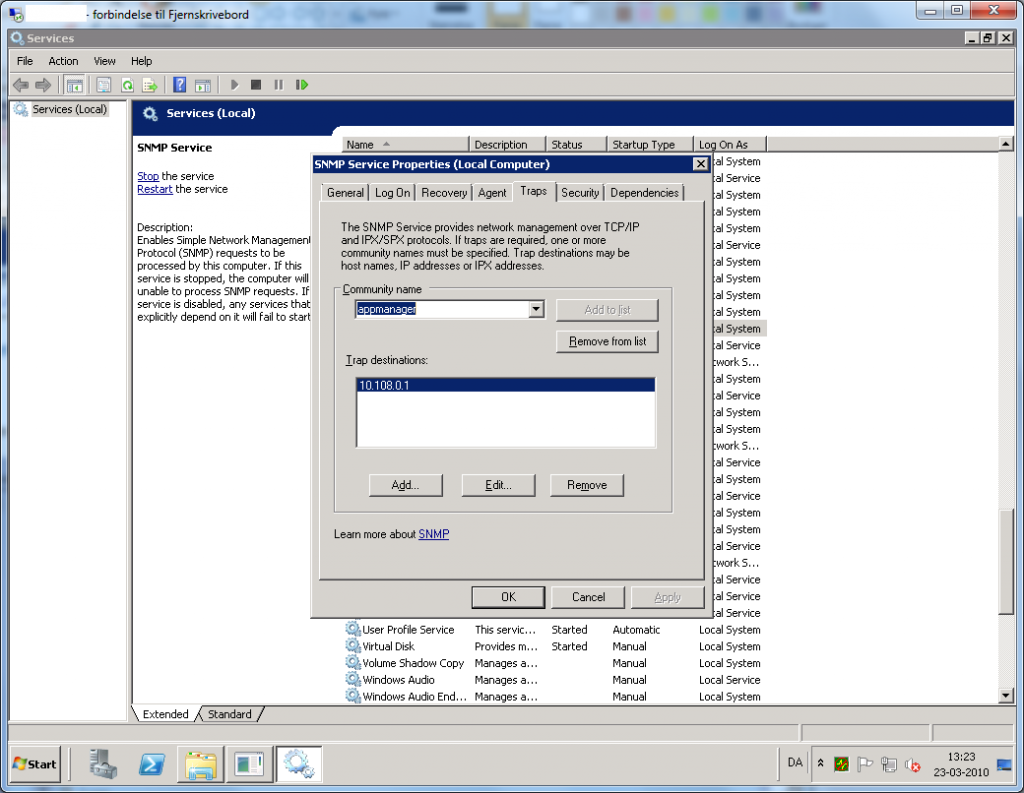
Now startup services in adminsitration tools, and right click on SNMP Services and choice Properties.
Go to Traps, and type community name, in my example it is appmanager, and the traps destionations should be the nimbus server or where you are going to install the snmptd agents in nimbus.

No go into nimbus and install snmptd and dom_traps on the host where you will monitoring the Dell openmanage hardware.
And then go to host, and right click on snmptd agents, and choice configure.

Press the last icon, “User/Security Manager” and put in the community name from last step, in my example that will be appmanager.

Now you should be running

Sponsor link: http://www.it-århus.dk