Category Archives: Andet

Fixing SAML Authentication Failure After FortiGate Upgrade with Microsoft Entra ID – Firewall Authentication Failed

A quick post on what broke after a FortiGate firmware upgrade—and the one setting that fixed it.

After upgrading a FortiGate firewall to the latest firmware, I ran into an unexpected problem:
SAML authentication suddenly stopped working for users signing in via
Microsoft Entra ID (formerly Azure AD). The configuration looked intact—certificates were present,
the SAML setup was unchanged—yet logins kept failing.
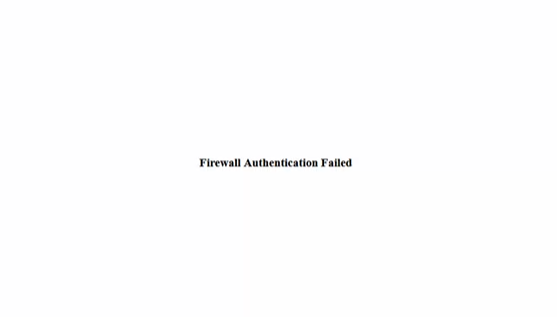
Forticlient users, will get Firewall Authentication Failed
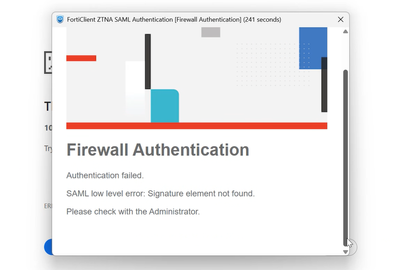

It wasn’t a lost configuration or a certificate mismatch. It turned out to be a change in
how SAML assertions are validated in the newest FortiGate versions when
Microsoft Entra ID is the Identity Provider (IdP).

The Root Cause
The latest FortiGate firmware expects the IdP to sign both the SAML response and the SAML assertion.
If your Entra ID configuration only signs the response (which used to be sufficient), authentication will fail
after the upgrade.

The Fix (Microsoft Entra ID setting)

  • Open the Microsoft Entra admin center and go to your Enterprise application for FortiGate.
  • Navigate to Single sign-on → SAML Certificates → SAML Signing Certificate → Edit.
  • Under Signing option, select: Sign SAML response and assertion.
  • Save the change and test authentication again.
  • Once this option was enabled, users were able to authenticate successfully again.

    Why This Matters
    Requiring signatures on both the response and the assertion strengthens the integrity of the SAML flow:
    FortiGate can verify not only the envelope (response) but also the identity claims (assertion).
    This improves security, but it may catch existing deployments by surprise after an upgrade.

    Takeaway

    • If SAML breaks after a FortiGate firmware upgrade with Entra ID as IdP, don’t assume your configuration is lost.
    • Enable “Sign SAML response and assertion” in Microsoft Entra ID for the affected application.
    • Re-test sign-in—authentication should start working immediately.

    Reference
    Fortinet community article on post-upgrade SAML issues:
    Troubleshooting Tip – SAML Authentication fails after firmware upgrade

    Tip: If you manage multiple FortiGate clusters, note this requirement in your upgrade checklist to avoid surprise outages.
    Linux Docker contrainer and PRTG

    Simple script to monitor that all docker container is running, and report the status back to PRTG
    It return 1 if the docker is running, or else it will return 0.

    #!/bin/bash
    echo  "<prtg>"
    #dockerlist_arr=( $(docker ps -a) )
    readarray -t dockerlist_arr < <( docker ps -a | awk '{print $NF}' | tail -n +2 )
    for i in "${dockerlist_arr[@]}"
    do
       echo "<result>"
       echo "<channel>$i</channel>"
       if [ "$( docker container inspect -f '{{.State.Running}}' $i )" = "true" ]; then
            echo "<value>1</value>"
       else
            echo "<value>0</value>"
       fi
       echo "<LimitMode>1</LimitMode>"
       echo "<LimitMaxError>1</LimitMaxError>"
       echo "<LimitMinError>1</LimitMinError>"
       echo "</result>"
    # or do whatever with individual element of the array
    done
    echo "</prtg>"
    

    Veeam backup and Replication – Failed to call RPC function ‘Vss.TruncateSqlLogs’

    Today i have this warning in my Veeam Backup and Replication backup job log, for an SQL server:
    Failed to finalize guest processing. Details: Failed to call RPC function ‘Vss.TruncateSqlLogs’: Error code: 0x80004005. Failed to invoke func [TruncateSqlLogs]: Unspecified error. Failed to process ‘TruncateSQLLog’ command. Failed to truncate SQL server transaction logs for instances: . See guest helper log.

    I found this in the event viewer on the SQL server:
    BACKUP failed to complete the command BACKUP LOG [databasename]. Check the backup application log for detailed messages.

    So i check the veeam backup log file on the SQL server:
    C:\ProgramData\Veeam\Backup
    File VeeamGuestHelper_Lastdatefile.log

    Where i see this:

    19-12-2022 02:08:56 5080 Database found: [databasename]. Recovery model: 1. Is readonly: false. State: 0.
    19-12-2022 02:13:56 5080 WARN Cannot truncate SQL logs for database: [databasename]. Code = 0x80040e31
    19-12-2022 02:13:56 5080 WARN Code meaning = IDispatch error #3121
    19-12-2022 02:13:56 5080 WARN Source = Microsoft OLE DB Driver for SQL Server
    19-12-2022 02:13:56 5080 WARN Description = Query timeout expired
    19-12-2022 02:13:56 5080 WARN No OLE DB Error Information found: hr = 0x80004005

    What i did to fix this error is that i give the user: NT AUTHORITY\SYSTEM the rights db_backupoperator rights to the specific database, that fault.

    And also change this timeout value in regedit:

    Windows Registry Editor Version 5.00
    
    [HKEY_LOCAL_MACHINE\SOFTWARE\Veeam\Veeam Backup and Replication]
    "SqlExecTimeout"=dword:00000600
    "SqlLogBackupTimeout"=dword:00003600
    "SqlConnectionTimeout"=dword:00000300
    

    And also under WOW6432Node

    Windows Registry Editor Version 5.00
    
    [HKEY_LOCAL_MACHINE\SOFTWARE\WOW6432Node\VeeaM\Veeam Backup and Replication]
    "SqlLogBackupTimeout"=dword:00003600
    "SqlExecTimeout"=dword:00000600
    "SqlConnectionTimeout"=dword:00000300
    

    Then try to running the job again.

    Extend a raidset with STORCLI CLI

    You can use this command to see the status of the Raid Controller and Raidset.

    storcli /c0 show
    Generating detailed summary of the adapter, it may take a while to complete.
    
    Controller = 0
    Status = Success
    Description = None
    
    Product Name = Intel(R) RAID Controller RS3DC080
    Serial Number = SK94678290
    SAS Address =  500605b00f7ef7e0
    PCI Address = 00:b5:00:00
    System Time = 03/18/2022 15:44:57
    Mfg. Date = 11/24/19
    Controller Time = 03/18/2022 15:44:29
    FW Package Build = 24.21.0-0126
    BIOS Version = 6.36.00.3_4.19.08.00_0x06180203
    FW Version = 4.680.00-8519
    Driver Name = lsi-mr3
    Driver Version = 7.702.13.00
    Current Personality = RAID-Mode
    Vendor Id = 0x1000
    Device Id = 0x5D
    SubVendor Id = 0x8086
    SubDevice Id = 0x9360
    Host Interface = PCI-E
    Device Interface = SATA-3G
    Bus Number = 181
    Device Number = 0
    Function Number = 0
    Drive Groups = 1
    
    TOPOLOGY :
    ========
    
    -----------------------------------------------------------------------------
    DG Arr Row EID:Slot DID Type  State BT       Size PDC  PI SED DS3  FSpace TR
    -----------------------------------------------------------------------------
     0 -   -   -        -   RAID5 Optl  N    5.451 TB dflt N  N   dflt N      N
     0 0   -   -        -   RAID5 Optl  N    5.451 TB dflt N  N   dflt N      N
     0 0   0   252:4    8   DRIVE Onln  N  930.390 GB dflt N  N   dflt -      N
     0 0   1   252:5    9   DRIVE Onln  N  930.390 GB dflt N  N   dflt -      N
     0 0   2   252:6    10  DRIVE Onln  N  930.390 GB dflt N  N   dflt -      N
     0 0   3   252:7    11  DRIVE Onln  N  930.390 GB dflt N  N   dflt -      N
     0 0   4   252:0    15  DRIVE Onln  N  930.390 GB dflt N  N   dflt -      N
     0 0   5   252:1    12  DRIVE Onln  N  930.390 GB dflt N  N   dflt -      N
     0 0   6   252:2    13  DRIVE Onln  N  930.390 GB dflt N  N   dflt -      N
    -----------------------------------------------------------------------------
    
    DG=Disk Group Index|Arr=Array Index|Row=Row Index|EID=Enclosure Device ID
    DID=Device ID|Type=Drive Type|Onln=Online|Rbld=Rebuild|Dgrd=Degraded
    Pdgd=Partially degraded|Offln=Offline|BT=Background Task Active
    PDC=PD Cache|PI=Protection Info|SED=Self Encrypting Drive|Frgn=Foreign
    DS3=Dimmer Switch 3|dflt=Default|Msng=Missing|FSpace=Free Space Present
    TR=Transport Ready
    
    Virtual Drives = 1
    
    VD LIST :
    =======
    
    -------------------------------------------------------------
    DG/VD TYPE  State Access Consist Cache Cac sCC     Size Name
    -------------------------------------------------------------
    0/0   RAID5 Optl  RW     Yes     RWBD  -   ON  5.451 TB
    -------------------------------------------------------------
    
    EID=Enclosure Device ID| VD=Virtual Drive| DG=Drive Group|Rec=Recovery
    Cac=CacheCade|OfLn=OffLine|Pdgd=Partially Degraded|Dgrd=Degraded
    Optl=Optimal|RO=Read Only|RW=Read Write|HD=Hidden|TRANS=TransportReady|B=Blocked|
    Consist=Consistent|R=Read Ahead Always|NR=No Read Ahead|WB=WriteBack|
    AWB=Always WriteBack|WT=WriteThrough|C=Cached IO|D=Direct IO|sCC=Scheduled
    Check Consistency
    
    Physical Drives = 8
    
    PD LIST :
    =======
    
    -------------------------------------------------------------------------------------
    EID:Slt DID State DG       Size Intf Med SED PI SeSz Model                   Sp Type
    -------------------------------------------------------------------------------------
    252:0    15 Onln   0 930.390 GB SATA SSD N   N  512B Samsung SSD 870 QVO 1TB U  -
    252:1    12 Onln   0 930.390 GB SATA SSD N   N  512B Samsung SSD 870 QVO 1TB U  -
    252:2    13 Onln   0 930.390 GB SATA SSD N   N  512B Samsung SSD 870 QVO 1TB U  -
    252:3    14 UGood  - 930.390 GB SATA SSD N   N  512B Samsung SSD 870 QVO 1TB U  -
    252:4     8 Onln   0 930.390 GB SATA SSD N   N  512B Samsung SSD 860 EVO 1TB U  -
    252:5     9 Onln   0 930.390 GB SATA SSD N   N  512B Samsung SSD 860 EVO 1TB U  -
    252:6    10 Onln   0 930.390 GB SATA SSD N   N  512B Samsung SSD 860 EVO 1TB U  -
    252:7    11 Onln   0 930.390 GB SATA SSD N   N  512B Samsung SSD 860 EVO 1TB U  -
    -------------------------------------------------------------------------------------
    
    EID=Enclosure Device ID|Slt=Slot No.|DID=Device ID|DG=DriveGroup
    DHS=Dedicated Hot Spare|UGood=Unconfigured Good|GHS=Global Hotspare
    UBad=Unconfigured Bad|Onln=Online|Offln=Offline|Intf=Interface
    Med=Media Type|SED=Self Encryptive Drive|PI=Protection Info
    SeSz=Sector Size|Sp=Spun|U=Up|D=Down|T=Transition|F=Foreign
    UGUnsp=Unsupported|UGShld=UnConfigured shielded|HSPShld=Hotspare shielded
    CFShld=Configured shielded|Cpybck=CopyBack|CBShld=Copyback Shielded
    
    
    Cachevault_Info :
    ===============
    
    ---------------------------------------------------------
    Model  State   Temp Mode MfgDate    Next Learn
    ---------------------------------------------------------
    CVPM02 Optimal 23C  -    2020/04/09 2022/03/31  00:41:59
    ---------------------------------------------------------

    Here you can see under PD List, that drive 252:3 14 stand as UGood. Thats the new disk i have put into the server, and have been detected by the raidset.

    To include this disk into the array that you see under VD List, you need to do this

     storcli /c0/v0 start migrate type=raid5 option=add drives=252:3

    This will add the disk to the raidset. This can takes hours and even days, if you have a big raidset.
    You can check the status with this command:

    storcli /c0/v0 show migrate
    Controller = 0
    Status = Success
    Description = None
    
    
    VD Operation Status :
    ===================
    
    ------------------------------------------------------------
    VD Operation      Progress% Status      Estimated Time Left
    ------------------------------------------------------------
     0 Reconstruction         2 In progress 9 Hours 52 Minutes
    ------------------------------------------------------------
    
    DG=Arrays | Slot=Drive Bay No|VD=Virtual Drive/Logical Drive|EID=Enclosure Device ID

    Here you can see that it will take 9 hours and 52 minutes to complete the Reconstruction

    When it done with the reconstuction, the command from before will output this:

    VD Operation Status :
    ===================
    
    -----------------------------------------------------------
    VD Operation Progress% Status          Estimated Time Left 
    -----------------------------------------------------------
     0 Migrate   -         Not in progress -                   
    -----------------------------------------------------------

    And then you can check the array with the command from the top of this guide

    storcli /c0 show

    After this you need to change the partition table, and then expand the volume.

    Resetting windows password, with Windows ISO

    If you have restored a server, or somehow lost the password for your windows installation, you can reset the password with only a Windows installation ISO or USB. It doesn’t need to be the right version, just a newer one (later that than 2012R2).

    All you need to do is boot you computer/server with the ISO file.

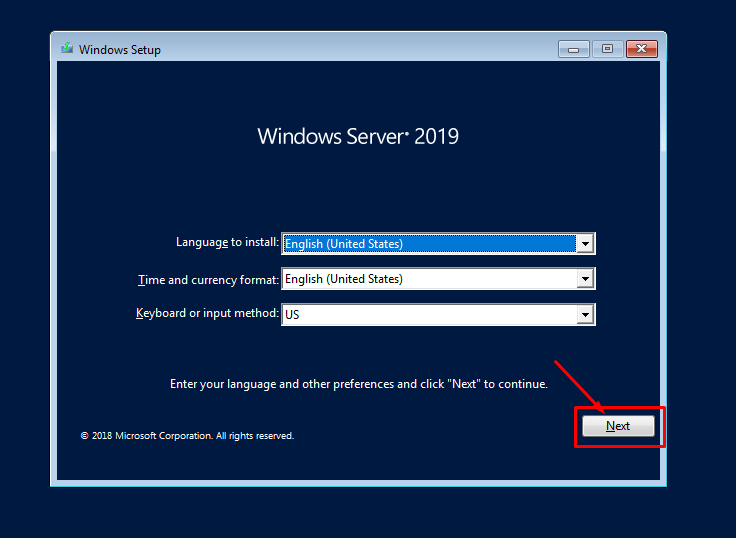
    After your have started it, set the “Keyboard or input method”, to the correct language and click Next
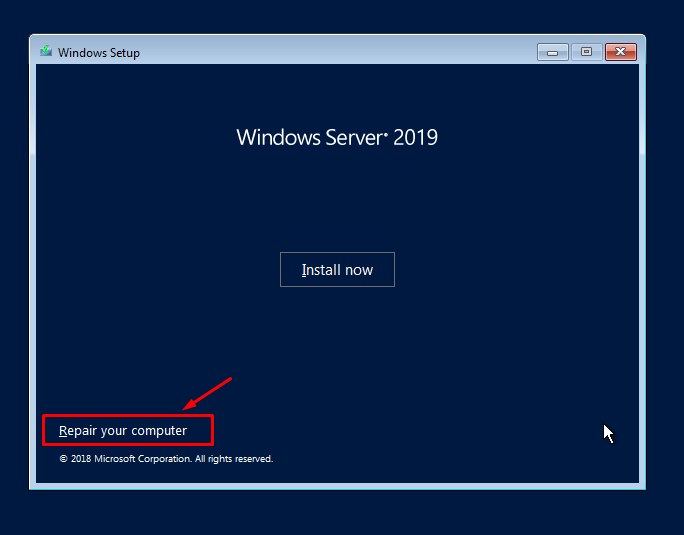
    Click on “Repair your computer”
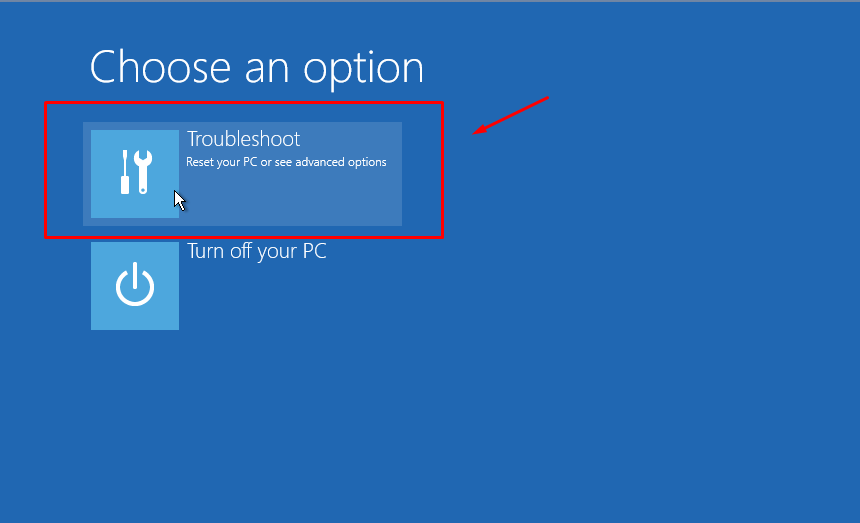
    Click on “Troubleshoot”
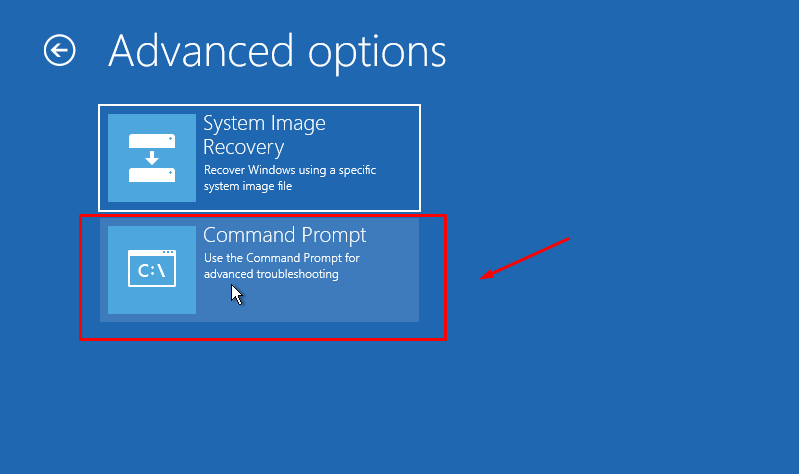
    Click on “Command Prompt”
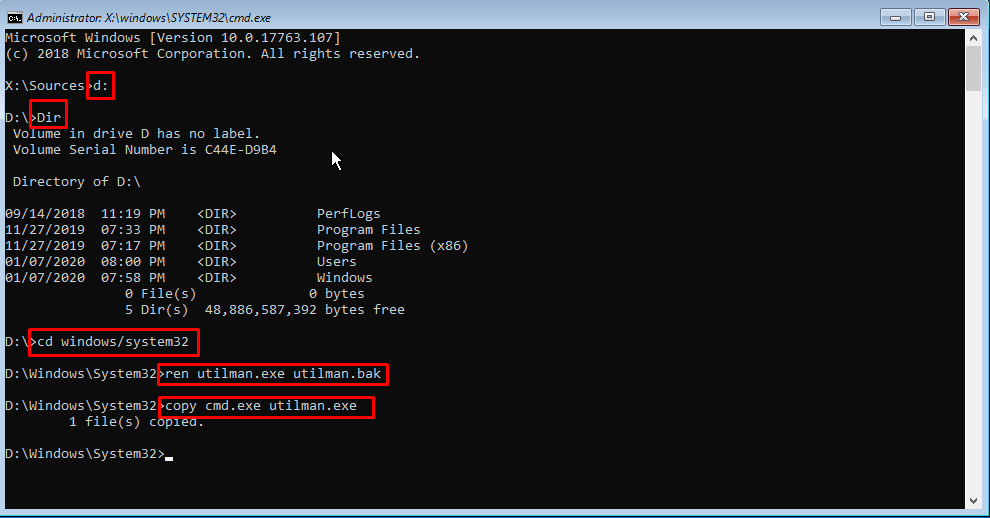
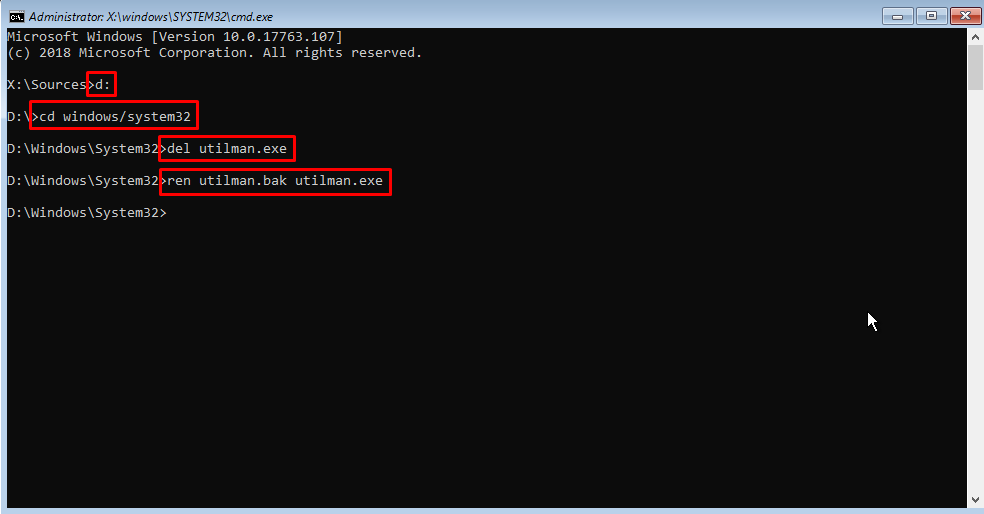
    Change to the OS drive, in this example it’s d: it could also be c:
    then change directory to windows\system32

    And then rename the file utilman.exe to utilman.bak
    And last copy cmd.exe to utilman.exe

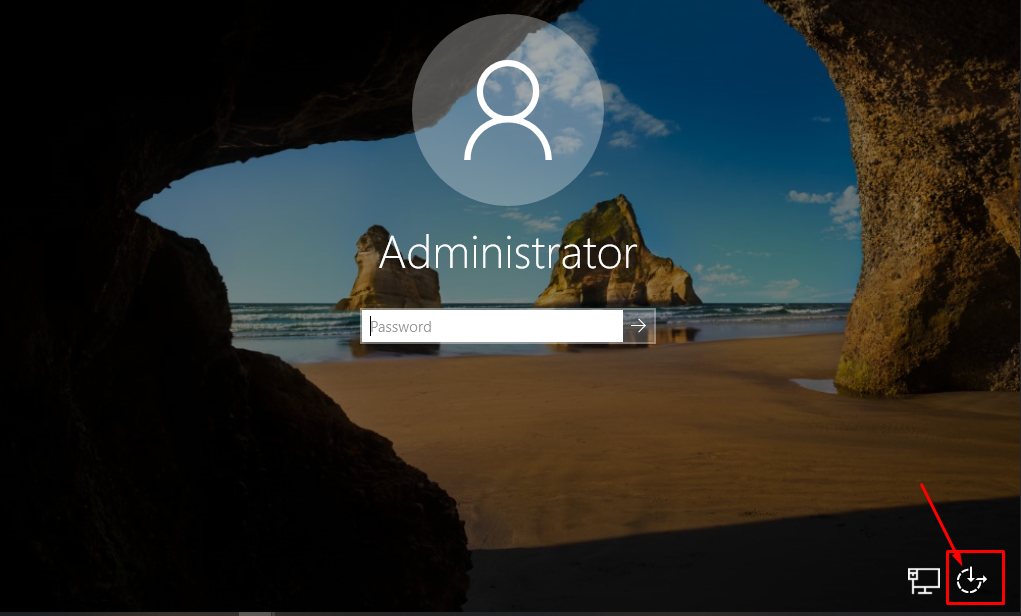
    Then you should close the windows, and reboot your computer

    Click on the “easy access tab” and a command prompt will start
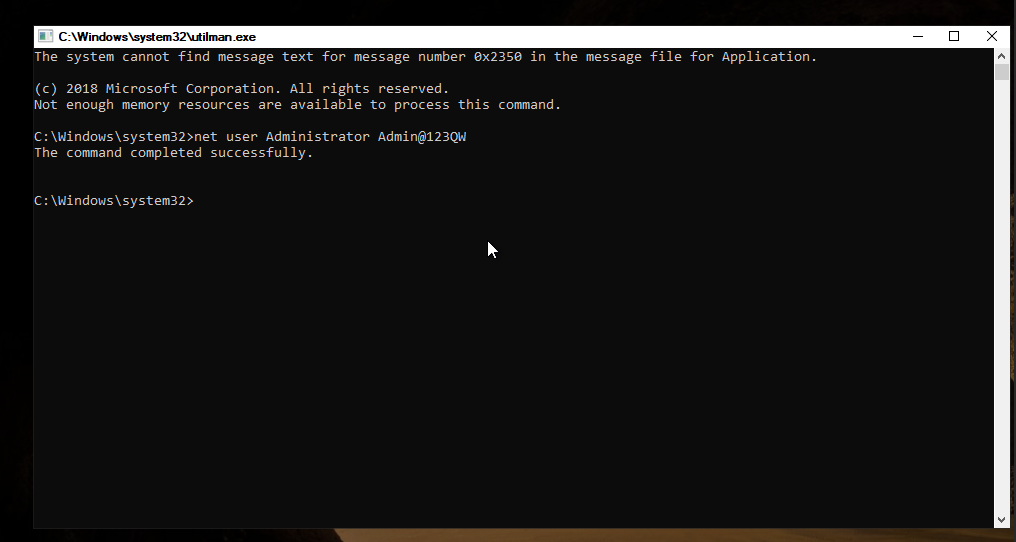
    Type “net user administrator NEWPASSWORD”

    After the password have been changed, please close the command prompt, and login with “Administrator” and the new password you just have changed it to.

    When you are login, you need to clean up, so that utilman.exe, is the correct utilman.exe file. so change to directory c:\windows\system32, and del tuilman.exe and rename utilman.bak back to utilman.exe

    Now you are finish, and you have recovered your password.

    List all shares folders and thier permissions

    <#
                .SYNOPSIS
                This script will list all shares on a computer, and list all the share permissions for each share.
    
                .DESCRIPTION
                The script will take a list all shares on a local or remote computer.
    
                .PARAMETER Computer
                Specifies the computer or array of computers to process
    
                .INPUTS
                Get-SharePermissions accepts pipeline of computer name(s)
    
                .OUTPUTS
                Produces an array object for each share found.
    
                .EXAMPLE
                C:\PS> .\Get-SharePermissions # Operates against local computer.
    
                .EXAMPLE
                C:\PS> 'computerName' | .\Get-SharePermissions
    
                .EXAMPLE
                C:\PS> Get-Content 'computerlist.txt' | .\Get-SharePermissions | Out-File 'SharePermissions.txt'
    
                .EXAMPLE
                Get-Help .\Get-SharePermissions -Full
    #>
    
    # Written by BigTeddy November 15, 2011
    # Last updated 9 September 2012
    # Ver. 2.0
    # Thanks to Michal Gajda for input with the ACE handling.
    [cmdletbinding()]
    
    param([Parameter(ValueFromPipeline=$True,
        ValueFromPipelineByPropertyName=$True)]$Computer = '.')
    
    $shares = gwmi -Class win32_share -ComputerName $computer | select -ExpandProperty Name
    foreach ($share in $shares) {
        $acl = $null
        Write-Host $share -ForegroundColor Green
        Write-Host $('-' * $share.Length) -ForegroundColor Green
        $objShareSec = Get-WMIObject -Class Win32_LogicalShareSecuritySetting -Filter "name='$Share'"  -ComputerName $computer
        try {
            $SD = $objShareSec.GetSecurityDescriptor().Descriptor
            foreach($ace in $SD.DACL){
                $UserName = $ace.Trustee.Name
                If ($ace.Trustee.Domain -ne $Null) {$UserName = "$($ace.Trustee.Domain)\$UserName"}
                If ($ace.Trustee.Name -eq $Null) {$UserName = $ace.Trustee.SIDString }
                [Array]$ACL += New-Object Security.AccessControl.FileSystemAccessRule($UserName, $ace.AccessMask, $ace.AceType)
                } #end foreach ACE
            } # end try
        catch
            { Write-Host "Unable to obtain permissions for $share" }
        $ACL
        Write-Host $('=' * 50)
    } # end foreach $share
    

    MSSQL SP_WHO2 order by db / databases

    Order sp_who2, after database with this commands:

    declare @tempTable table (SPID INT,Status VARCHAR(255),
    Login VARCHAR(255),HostName VARCHAR(255),
    BlkBy VARCHAR(255),DBName VARCHAR(255),
    Command VARCHAR(255),CPUTime INT,
    DiskIO INT,LastBatch VARCHAR(255),
    ProgramName VARCHAR(255),SPID2 INT,
    REQUESTID INT);
    
     INSERT INTO @tempTable
    EXEC sp_who2 
    
    select *
    from @tempTable order by DBName

    Test SMTP TLS with OpenSSL with Auth

    On a linux box type these two commands

    echo -ne '[email protected]' | base64
    echo -ne 'password' | base64

    The command will return with the username and password in base64 format.
    Example:

    root@Linux-homeserver:~# echo -ne '[email protected]' | base64
    dXNlcm5hbWVAZG9tYWluLnByZWZpeA==
    root@Linux-homeserver:~# echo -ne 'password' | base64
    cGFzc3dvcmQ=

    So now you need to telnet with OpenSSL to the mailserver:

    openssl s_client -debug -starttls smtp -crlf -connect mailserver.kennethdalbjerg.dk:465

    After you have connection, you need to present yourself
    Example:

    ehlo host.kennethdalbjerg.dk

    Some mailserver, do check if the ehlo is you corrert PTR record, for the IP address you are coming from, but most do not.

    The mail server will return with:
    250 mailserver.kennethdalbjerg.dk Hello dell1 [10.10.10.10]

    You will now try to authenticated you self, if you don’t need to AUTH, please go to last code example in this blog.

    AUTH LOGIN

    And the mailserver will return with:
    VXNlcm5hbWU6

    Here you type you username in base64 format

    dXNlcm5hbWVAZG9tYWluLnByZWZpeA==

    And the mailserver will return with:
    UGFzc3dvcmQ6

    Please now type you password in base64 format

    cGFzc3dvcmQ=

    The server should now return with:
    235 2.7.0 Authentication successful

    After this you type normal email request to send an email
    Example: (You should not type the line starting with a >, it are what the mailserver return to you.

    mail from: [email protected]
    > 250 2.1.0 Sender OK
    rcpt to: [email protected]
    > 250 2.1.5 Recipient OK
    data
    > 354 Start mail input; end with <CRLF>.<CRLF>
    test
    .
    > 250 2.6.0 <604863cb-3dcc-4cee-9c1a-77fb6d951d43@mailserver.kennethdalbjerg.dk> [InternalId=9753870729240, Hostname=mailserver.kennethdalbjerg.dk] 1203 bytes in 1.581, 0,743 KB/sec Queued mail for delivery
    quit
    >221 2.0.0 Service closing transmission channel

    Match Veeam replicas folder with VM

    If you need to see what VM, that match to a VEEAM Replica folder on the disk system, this can be the solution
    The veeam replica folder looks like this:

    Let say that you need to find the VM, behind the folder “1cd328dbde6b42569a18b156570cb589”
    Run this command on you SCVMM Powershell

    get-vm | where location -like "*1cd328dbde6b42569a18b156570cb589*" | select name

    This will give you the name of the VM behind the folder “1cd328dbde6b42569a18b156570cb589”

    SQL Agent Job history – T SQL

    Here are a Script, that you can use to extract the SQL Agent Job History

    select 
     j.name as 'JobName',
     msdb.dbo.agent_datetime(run_date, run_time) as 'RunDateTime',
     ((run_duration/10000*3600 + (run_duration/100)%100*60 + run_duration%100 + 31 ) / 60) 
             as 'RunDurationMinutes'
    From msdb.dbo.sysjobs j 
    INNER JOIN msdb.dbo.sysjobhistory h 
     ON j.job_id = h.job_id 
    where j.enabled = 1   --Only Enabled Jobs
    --and j.name = 'TestJob' --Uncomment to search for a single job
    /*
    and msdb.dbo.agent_datetime(run_date, run_time) 
    BETWEEN '12/08/2012' and '12/10/2012'  --Uncomment for date range queries
    */
    order by JobName, RunDateTime desc

    This will also tell you the job steps

    select 
     j.name as 'JobName',
     s.step_id as 'Step',
     s.step_name as 'StepName',
     msdb.dbo.agent_datetime(run_date, run_time) as 'RunDateTime',
     ((run_duration/10000*3600 + (run_duration/100)%100*60 + run_duration%100 + 31 ) / 60) 
             as 'RunDurationMinutes'
    From msdb.dbo.sysjobs j 
    INNER JOIN msdb.dbo.sysjobsteps s 
     ON j.job_id = s.job_id
    INNER JOIN msdb.dbo.sysjobhistory h 
     ON s.job_id = h.job_id 
     AND s.step_id = h.step_id 
     AND h.step_id <> 0
    where j.enabled = 1   --Only Enabled Jobs
    --and j.name = 'TestJob' --Uncomment to search for a single job
    /*
    and msdb.dbo.agent_datetime(run_date, run_time) 
    BETWEEN '12/08/2012' and '12/10/2012'  --Uncomment for date range queries
    */
    order by JobName, RunDateTime desc

    Thanks to Chad Churchwell  – https://www.mssqltips.com/sqlservertip/2850/querying-sql-server-agent-job-history-data/