Tag Archives: esxi

Expand an EXT4, on a SCSI device

If you have vmware ESXi or Microsoft Hyper-v, you can expand a disk, from the hypervisor console, very simple. But afterwards the partition the servers is not expand.
It is always a good idea to create a Snapshot/checkpoint before. Just remember, that the disc can’t be expanded in Hyper-v when there are a checkpoint. So first expand the disk in Hyper-v and then create a snapshot.

To do this you first need to rescan the disk for change

echo "1" > /sys/class/block/sda/device/rescan

Replace sda with the disk name.
Then you can run fdisk -l /dev/sda, to see the disk information, if you got an error on the top like in the screenshot below

Then you need to repair the disk partition table.

parted -l
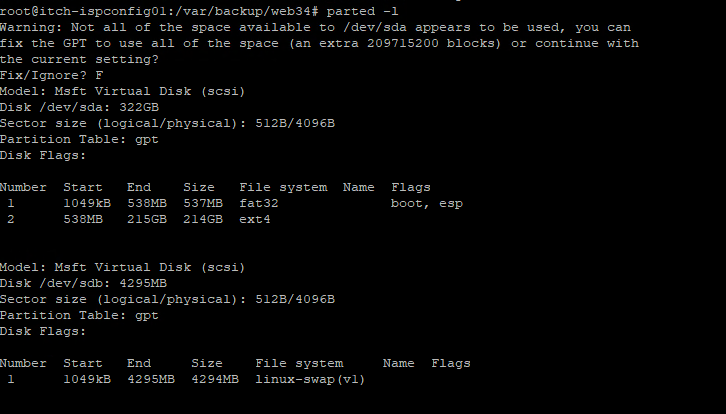
After you have check the partition table, you need to delete the old partition, and recreate it

This is done by type fdisk /dev/sda
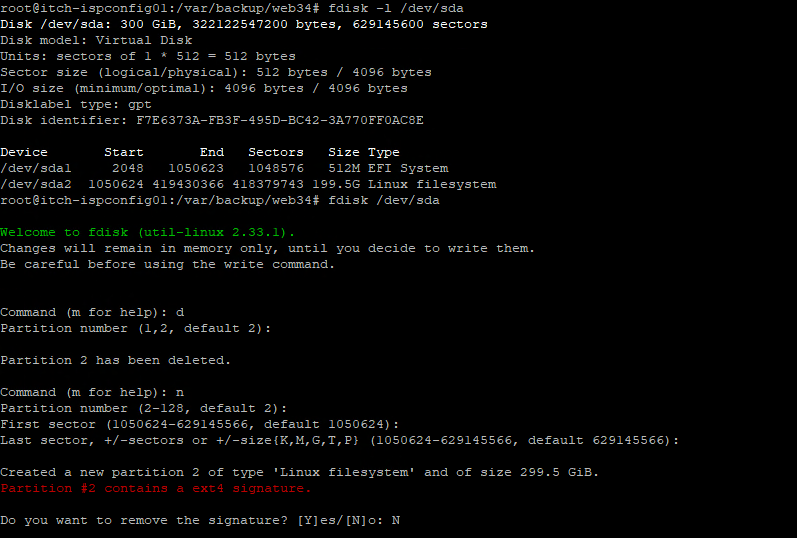
In the fdisk, you type d to delete, choice the partition, in the example is two. (Beaware that this guide can only be used to expand the last partition on the disk, if you have multiple)
Then you type n to create a new one, and just goes for the default once settings.
In the end type N to not remove the signature.

Then you w to save the settings

Then we just have to resize the ext4 information on the disk, this is done by the command resize2fs

Afterwards you can check that the server have been expand by the command df -h
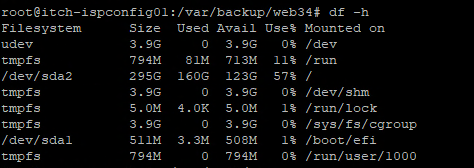
Here we have expand the disk from 195GB to 295GB.

Move vSwitch vlans information from old host to a new one

To use this examples, there requirements are: VMware PowerCLI and a VMWare vCenter.

This example will copy all vlan’s (Virtualportgroup) from one host to another.
It will take all vlan’s from vSwitch0 on the old host, and copy it to the new host on vSwitch1.

connect-viserver
$oldhost = get-vmhost -name OldServerIP
$newhost = get-vmhost -name NewServerIP
 
$oldhost | get-virtualswitch -name vSwitch0 | get-virtualportgroup | foreach { $newportgroup = $newhost | get-virtualswitch -name vSwitch1 | new-virtualportgroup -name $_.Name -VLanID $_.VLanID }


Install Dell OpenManage on ESXi 5.1 host

If you have follow my guide to install the Dell Openmanage on a ESXi 4.1 host, and try the same thing on a ESXi 5.1 you will get a warning from the host saying:
This operation is NOT supported on 5.1.0 platform.

You need to install it directly on the ESXi host in 5.1 version.
So you just need to upload the Dell OM-SrvAdmin-Dell-Web-7.2.0-6945.VIB-ESX51i.zip file to the host, i will do this with WinSCP, i will put in the /tmp directory.

Then SSH to the host and run this commands:

esxcli software vib install –d /tmp/OM-SrvAdmin-Dell-Web-7.2.0-6945.VIB-ESX51i.zip

Output:

~ # esxcli software vib install -d /tmp/OM-SrvAdmin-Dell-Web-7.2.0-6945.VIB-ESX51i.zip
Installation Result
   Message: The update completed successfully, but the system needs to be rebooted for the changes to be effective.
   Reboot Required: true
   VIBs Installed: Dell_bootbank_OpenManage_7.2-0000
   VIBs Removed:
   VIBs Skipped:

After you have install the VIB packages successfully, the ESXi 5.1 host needs to be restarted. When the host is ready again, you should be able to see that UserVars.CIMvmw_OpenManageProviderEnabled is set to 1. In this location

Select the host and go to the Configuration tab. Click on Advanced Settings and find the UserVars.CIMvmw_OpenManageProviderEnabled, and check that this is set to 1. In ESXi 4.1, this is UserVars.CIMoemProviderEnabled

Revert to snapshot causes virtual machine to be suspended

Error:

host cpu is incompatible with the virtual machine’s requirements at cpuid level 0x1

Details

If you take a snapshot of the virtual machine and then VMotion or cold-migrate the virtual machine to another host that uses a different CPU model and/or family, you may experience the following symptoms:

  • The virtual machine becomes stuck in a suspended state after performing a Revert to Snapshot operation
  • If you try to remove the virtual machine from its suspended state, you see the error:
    Error: error encounter trying to restore cpu state from file.

Solution

This issue may occur if the CPU information as recorded in the virtual machine configuration file (.vmx) after the Revert to Snapshot operation does not match the current CPU information. If this occurs, the server does not un-suspend the virtual machine.
To resolve this issue, you must remove the checkpoint.* lines from the .vmxfile. Removing these lines allows you to power on the virtual machine.
To remove the checkpoint.* lines:
  1. Ensure that the virtual machine is not running another process.
  2. Unregister the virtual machine.
  3. Open the .vmx file in a text editor.
  4. Remove the checkpoint.* lines from the file.
  5. Save and close the file.
  6. Re-register the virtual machine.

    The virtual machine is in a powered off state. You can now power it on.

Vmware ESXi (ESX) 4.0 and Dell Openmanage SNMP Traps

First you need to install:
http://www.vmware.com/downloads/download.do?downloadGroup=VCLI40U1

This is a vmware CLI tools. Install it on a windows machine.
After you install remember to log out and the log in, else you will get this error:

Can’t load ‘C:/Program Files/VMware/VMware VI Remote CLI/Perl/site/lib/auto/XML/LibXML/Common/Common.dll’ for module XML::LibXML::Common: load_file:The specified module could not be found at C:/Program Files/VMware/VMware VI Remote CLI/Perl/lib/DynaLoader.pm line 230.

Then download Dell Openmanage  offline bundle to the same machine that you install Vmware vsphere CLI:

http://support.dell.com/support/downloads/download.aspx?c=us&cs=04&l=en&s=bsd&releaseid=R250294&SystemID=pwe_r710&servicetag=GWT2J4J&os=EIx4&osl=en&deviceid=21859&devlib=0&typecnt=0&vercnt=1&catid=-1&impid=-1&formatcnt=0&libid=36&typeid=-1&dateid=-1&formatid=-1&source=-1&fileid=365571

Put the Vmware ESXI into maintaince mode.

Start a dos prompt, and go to:

c:\program fileres\vmware\VMware vSphere CLI\bin

Type

vihostupdate.pl –server <IP address of ESXi 4 Host> -i -b <path to Dell OpenManage file>   (On the windows machine)

Reboot the Vmware ESXi machine.

vicfg-advcfg.pl –server <IP address of ESXi 4 Host> –set 1 UserVars.CIMoemProviderEnabled

Reboot the Vmware ESXi machine once again.

Make sure that the Dell openmanage is install on the ESXi.
/usr/lib/ext/dell/dataeng status if not then start it: /usr/lib/ext/dell/dataeng start (This commands should be run at the ESXi host)

vicfg-snmp.pl –server <IP address of ESXi 4 Host> -t <IP address of SNMP Traps destination>/<SNMP community> (On the windows machine)

And this command for enable SNMP Traps
vicfg-snmp.pl –server <IP address of ESXi 4 Host> -E (On the windows machine)

And then this to make Dell Openmanage happy about the SNMP traps configuration.
vicfg-snmp.pl –server <IP address of ESXi 4 Host> -c appmanager

Exit the maintenance mode.

If you need to test the SNMP traps you can run this command

vicfg-snmp.pl –server <IP address of ESXi 4 Host> -T  (On the windows machine)

And if you need to access the openmanage web interface, start Dell openmanage on a windows machine, and then logout (Right corner), and then on the login screen click on “Manage Remote Node”.

Type the ESXi hostname the username is root and the password is the password for root and tick the Ignore Certificate Warnings. Then click login.