Category Archives: Linux

Extend a debian/ubuntu partition on a virtual machine.

This is howto extend a virtual machine drive running Debian / Ubuntu
1. First you need to make sure that there are no snapshot of the VM. If there are snapshot, you can extend the drive in either vmWare or Hyper-V.
2. If the server is running Hyper-v, you can’t extend an IDE drive. If it are an IDE device, you need to turn of the computer first.
3. Make sure that the partition is not an extended partition. If it are you can still extend it, but then this guide won’t work for you. Run fdisk -l /dev/sdX
4. Make sure that the drive is not an LVM storage. Then you can’t used this guide.

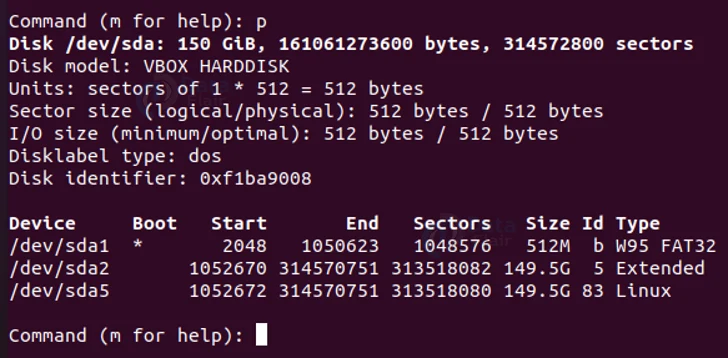
The above image, showes that there are an extend partition.

After you have checked, that there are no snapshot, the drive is not an IDE and it the last partition on the drive that needed to extend. Then goes to yours hypervisor and extend the drive, with the amount of storage you will like to have the drive extend with.

Then back on the linux server, install the package cloud-guest-utils, with this command

apt install cloud-guest-utils

Then run these commands:

ls /sys/class/scsi_host/ | while read host ; do echo "- - -" > /sys/class/scsi_host/$host/scan ; done
ls /sys/class/scsi_device/ | while read host ; do echo 1 > /sys/class/scsi_device/$host/device/rescan ; done

This will rescan the SCSI bus for new drive and drive extension.

After you have run the rescan you should extend the partition you want to extend

growpart /dev/sda 2

This commands will extend partition 2 on /dev/sda with the amount of free space on the drive, after partition 2.

After the partition have been extended, you need to extend the filesystem. This can be done by resize2fs

resize2fs /dev/sda2


Expand an EXT4, on a SCSI device

If you have vmware ESXi or Microsoft Hyper-v, you can expand a disk, from the hypervisor console, very simple. But afterwards the partition the servers is not expand.
It is always a good idea to create a Snapshot/checkpoint before. Just remember, that the disc can’t be expanded in Hyper-v when there are a checkpoint. So first expand the disk in Hyper-v and then create a snapshot.

To do this you first need to rescan the disk for change

echo "1" > /sys/class/block/sda/device/rescan

Replace sda with the disk name.
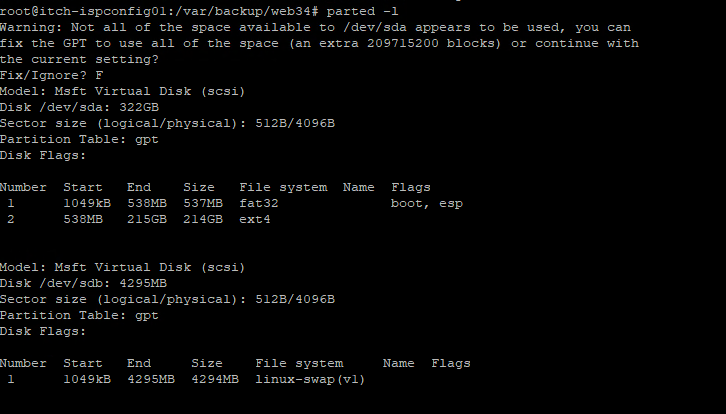
Then you can run fdisk -l /dev/sda, to see the disk information, if you got an error on the top like in the screenshot below

Then you need to repair the disk partition table.

parted -l

After you have check the partition table, you need to delete the old partition, and recreate it

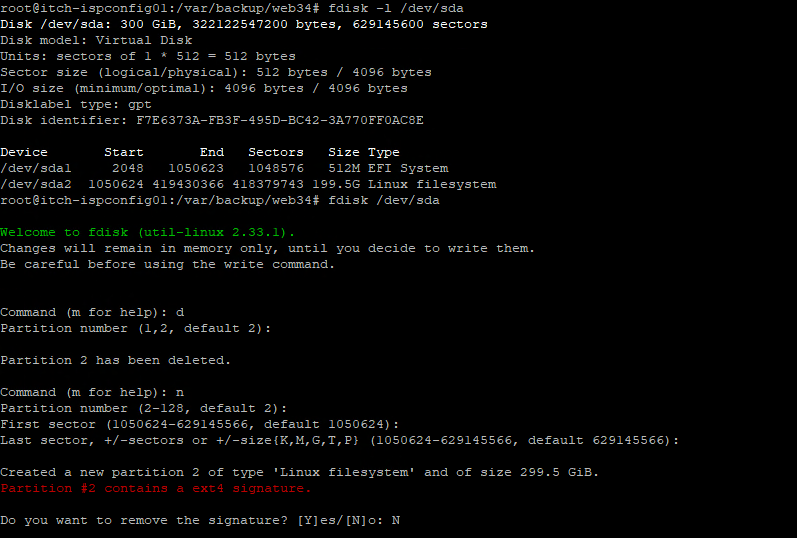
This is done by type fdisk /dev/sda

In the fdisk, you type d to delete, choice the partition, in the example is two. (Beaware that this guide can only be used to expand the last partition on the disk, if you have multiple)
Then you type n to create a new one, and just goes for the default once settings.
In the end type N to not remove the signature.

Then you w to save the settings

Then we just have to resize the ext4 information on the disk, this is done by the command resize2fs

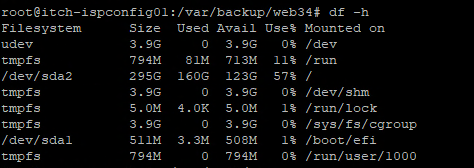
Afterwards you can check that the server have been expand by the command df -h

Here we have expand the disk from 195GB to 295GB.

Extend a raidset with STORCLI CLI

You can use this command to see the status of the Raid Controller and Raidset.

storcli /c0 show
Generating detailed summary of the adapter, it may take a while to complete.

Controller = 0
Status = Success
Description = None

Product Name = Intel(R) RAID Controller RS3DC080
Serial Number = SK94678290
SAS Address =  500605b00f7ef7e0
PCI Address = 00:b5:00:00
System Time = 03/18/2022 15:44:57
Mfg. Date = 11/24/19
Controller Time = 03/18/2022 15:44:29
FW Package Build = 24.21.0-0126
BIOS Version = 6.36.00.3_4.19.08.00_0x06180203
FW Version = 4.680.00-8519
Driver Name = lsi-mr3
Driver Version = 7.702.13.00
Current Personality = RAID-Mode
Vendor Id = 0x1000
Device Id = 0x5D
SubVendor Id = 0x8086
SubDevice Id = 0x9360
Host Interface = PCI-E
Device Interface = SATA-3G
Bus Number = 181
Device Number = 0
Function Number = 0
Drive Groups = 1

TOPOLOGY :
========

-----------------------------------------------------------------------------
DG Arr Row EID:Slot DID Type  State BT       Size PDC  PI SED DS3  FSpace TR
-----------------------------------------------------------------------------
 0 -   -   -        -   RAID5 Optl  N    5.451 TB dflt N  N   dflt N      N
 0 0   -   -        -   RAID5 Optl  N    5.451 TB dflt N  N   dflt N      N
 0 0   0   252:4    8   DRIVE Onln  N  930.390 GB dflt N  N   dflt -      N
 0 0   1   252:5    9   DRIVE Onln  N  930.390 GB dflt N  N   dflt -      N
 0 0   2   252:6    10  DRIVE Onln  N  930.390 GB dflt N  N   dflt -      N
 0 0   3   252:7    11  DRIVE Onln  N  930.390 GB dflt N  N   dflt -      N
 0 0   4   252:0    15  DRIVE Onln  N  930.390 GB dflt N  N   dflt -      N
 0 0   5   252:1    12  DRIVE Onln  N  930.390 GB dflt N  N   dflt -      N
 0 0   6   252:2    13  DRIVE Onln  N  930.390 GB dflt N  N   dflt -      N
-----------------------------------------------------------------------------

DG=Disk Group Index|Arr=Array Index|Row=Row Index|EID=Enclosure Device ID
DID=Device ID|Type=Drive Type|Onln=Online|Rbld=Rebuild|Dgrd=Degraded
Pdgd=Partially degraded|Offln=Offline|BT=Background Task Active
PDC=PD Cache|PI=Protection Info|SED=Self Encrypting Drive|Frgn=Foreign
DS3=Dimmer Switch 3|dflt=Default|Msng=Missing|FSpace=Free Space Present
TR=Transport Ready

Virtual Drives = 1

VD LIST :
=======

-------------------------------------------------------------
DG/VD TYPE  State Access Consist Cache Cac sCC     Size Name
-------------------------------------------------------------
0/0   RAID5 Optl  RW     Yes     RWBD  -   ON  5.451 TB
-------------------------------------------------------------

EID=Enclosure Device ID| VD=Virtual Drive| DG=Drive Group|Rec=Recovery
Cac=CacheCade|OfLn=OffLine|Pdgd=Partially Degraded|Dgrd=Degraded
Optl=Optimal|RO=Read Only|RW=Read Write|HD=Hidden|TRANS=TransportReady|B=Blocked|
Consist=Consistent|R=Read Ahead Always|NR=No Read Ahead|WB=WriteBack|
AWB=Always WriteBack|WT=WriteThrough|C=Cached IO|D=Direct IO|sCC=Scheduled
Check Consistency

Physical Drives = 8

PD LIST :
=======

-------------------------------------------------------------------------------------
EID:Slt DID State DG       Size Intf Med SED PI SeSz Model                   Sp Type
-------------------------------------------------------------------------------------
252:0    15 Onln   0 930.390 GB SATA SSD N   N  512B Samsung SSD 870 QVO 1TB U  -
252:1    12 Onln   0 930.390 GB SATA SSD N   N  512B Samsung SSD 870 QVO 1TB U  -
252:2    13 Onln   0 930.390 GB SATA SSD N   N  512B Samsung SSD 870 QVO 1TB U  -
252:3    14 UGood  - 930.390 GB SATA SSD N   N  512B Samsung SSD 870 QVO 1TB U  -
252:4     8 Onln   0 930.390 GB SATA SSD N   N  512B Samsung SSD 860 EVO 1TB U  -
252:5     9 Onln   0 930.390 GB SATA SSD N   N  512B Samsung SSD 860 EVO 1TB U  -
252:6    10 Onln   0 930.390 GB SATA SSD N   N  512B Samsung SSD 860 EVO 1TB U  -
252:7    11 Onln   0 930.390 GB SATA SSD N   N  512B Samsung SSD 860 EVO 1TB U  -
-------------------------------------------------------------------------------------

EID=Enclosure Device ID|Slt=Slot No.|DID=Device ID|DG=DriveGroup
DHS=Dedicated Hot Spare|UGood=Unconfigured Good|GHS=Global Hotspare
UBad=Unconfigured Bad|Onln=Online|Offln=Offline|Intf=Interface
Med=Media Type|SED=Self Encryptive Drive|PI=Protection Info
SeSz=Sector Size|Sp=Spun|U=Up|D=Down|T=Transition|F=Foreign
UGUnsp=Unsupported|UGShld=UnConfigured shielded|HSPShld=Hotspare shielded
CFShld=Configured shielded|Cpybck=CopyBack|CBShld=Copyback Shielded


Cachevault_Info :
===============

---------------------------------------------------------
Model  State   Temp Mode MfgDate    Next Learn
---------------------------------------------------------
CVPM02 Optimal 23C  -    2020/04/09 2022/03/31  00:41:59
---------------------------------------------------------

Here you can see under PD List, that drive 252:3 14 stand as UGood. Thats the new disk i have put into the server, and have been detected by the raidset.

To include this disk into the array that you see under VD List, you need to do this

 storcli /c0/v0 start migrate type=raid5 option=add drives=252:3

This will add the disk to the raidset. This can takes hours and even days, if you have a big raidset.
You can check the status with this command:

storcli /c0/v0 show migrate
Controller = 0
Status = Success
Description = None


VD Operation Status :
===================

------------------------------------------------------------
VD Operation      Progress% Status      Estimated Time Left
------------------------------------------------------------
 0 Reconstruction         2 In progress 9 Hours 52 Minutes
------------------------------------------------------------

DG=Arrays | Slot=Drive Bay No|VD=Virtual Drive/Logical Drive|EID=Enclosure Device ID

Here you can see that it will take 9 hours and 52 minutes to complete the Reconstruction

When it done with the reconstuction, the command from before will output this:

VD Operation Status :
===================

-----------------------------------------------------------
VD Operation Progress% Status          Estimated Time Left 
-----------------------------------------------------------
 0 Migrate   -         Not in progress -                   
-----------------------------------------------------------

And then you can check the array with the command from the top of this guide

storcli /c0 show

After this you need to change the partition table, and then expand the volume.

Linux: Change default IP address on host with multiple IP address

If you have a host with multiple IP address on it, and you need to change witch IP address it present it with on the Internet, you can change the Default IP address, by changing the source IP address on the default route

ip route change default via 192.168.0.254 src 192.168.0.10

Of course the Linux host need to listen on the IP address.
You can see the changes by this command

ip route list
default via 192.168.0.254 dev eth0 src 192.168.0.10

Delete specific mail in Sophus Exim queu

To show the queue in sophus, from CLI type:

chroot /var/storage/chroot-smtp /bin/exim -bp

To delete a specific mail type

chroot /var/storage/chroot-smtp /bin/exim -Mrm {mailid}

example:

chroot /var/storage/chroot-smtp /bin/exim -Mrm 1daHZv-000EaR-0A

To see how many mails, there are in queue, you can type:

chroot /var/storage/chroot-smtp /bin/exim -bpc

Install Linux OSCore OS – With static network address

When you start the Linux OS – OSCore, from the bootable ISO file, you will just the a prompt.
To Install it, i following these steps

First we needed to be root

sudo su

Then we setup the IP address of the server

ip addr add 192.168.1.1/24 dev eth0
ip link set dev eth0 up
ip route add default via 192.168.1.254

Then we set the root password, and create a user

passwd
useradd itadmin
passwd itadmin

Then you ssh to the CoreOS server.

Then we need to setup the DNS settings

su
cd /etc
rm resolv.conf
vim resolv.conf

Type these into resolv.conf

nameserver 8.8.8.8
nameserver 8.8.4.4

We now need to setup the cloud-config-yaml file

cd /home/core/
vim cloud-config.yaml

Change the settings below so it fit you

#cloud-config
hostname: CoreOS_Name01
users:
- name: "YOURUSERNAME"
groups:
- "sudo"
- "docker"
ssh_authorized_keys:
- ssh-rsa YORESSSH-RSAKEY [email protected]
coreos:
units:
- name: static.network
content: |
[Match]
Name=eth0
[Network]
Address=192.168.1.1/24
Gateway=192.168.1.254
DNS=8.8.8.8
DNS=8.8.4.4

Then we just need to installed the CoreOS

coreos-install -d /dev/sda -C stable -c cloud-config.yaml
shutdown -h now

Remember after you have installed CoreOS, the username and password, and aslo the root password, will be lost.
You need to set this up in the Cloud-config file, if you for some reason will like static password after.

Unmount the CDROM from the server
Start the server again

Usefull things, about CoreOS, after you have installed it

cloud-config is located in /var/lib/coreos-install/user_data

if you need Boot Core os, with autologin. (If you for some reason can’t access the server though network).
Reboot the server, and press “e” in grup (Bootmenu) to edit the first boot option.
At the end of the line that begins with “linux$” add ” coreos.autologin=tty1″ (no quotes).
Press CTRL-X or F10 to boot. You will be logged in as “core” when the system boots.
And use sudo to become root
Tomcat Web Server SSL Certificate Installation

How to generate a CSR in Tomcat with Keytool

Create a New Keystore

You will need to create a new Keystore, this is done by this command:

keytool -genkey -alias domainname.prefix -keyalg RSA -keysize 2048 -keystore /path/domainname.prefix.jks

When the commands ask for the firstname and lastname, please type domainname.prefix instead of you name, else the certificate will issues to you name, instead of the domain name.

Generate a CSR from Your New Keystore

  1. Next, you need to generate a CSR file, this is done by this command
    keytool -certreq -alias domainname.prefix -file certreq.cer -keystore /path/domainname.prefix.jks
  2. Type the keystore password that you chose earlier and hit Enter.
  3. Please upload the certreq.cer, to you standard certificate supplier.

Installing the SSL Certificates to the Keystore

  1. You will then get a certificate, save it as signcert.cer
  2. Download aswell the correct intermediate certificate, aswell as the correct root certificate.
  3. Import them with this command:
    keytool -import -trustcacerts -alias root -file root.cer -keystore /path/domainname.prefix.jks
    
    keytool -import -trustcacerts -alias intermediate -file intermediate.cer -keystore /path/domainname.prefix.jks
  1. Import the signed certificate
    keytool -import -trustcacerts -alias domainanme.prefix -file signcert.cer -keystore /path/domainname.prefix.jks

Configuring your SSL Connector

Before Tomcat can accept secure connections, you need to configure an SSL Connector.

  1. In a text editor, open the Tomcat server.xml file.
    The server.xml file is usually located in the conf folder of your Tomcat’s home directory.
  1. Locate the connector that you want to use the new keystore to secure.
    Usually, a connector with port 443 or 8443 is used, as shown in step 4.
  1. If necessary, uncomment the connector.
    To uncomment a connector, remove the comment tags (<!– and –>).
  1. Specify the correct keystore filename and password in your connector configuration.

When you are done, your connector should look something like this:

<Connector port="443" maxHttpHeaderSize="8192" maxThreads="150" minSpareThreads="25" maxSpareThreads="75" enableLookups="false" disableUploadTimeout="true" acceptCount="100" scheme="https" secure="true" SSLEnabled="true"clientAuth="false" sslProtocol="TLS" keyAlias="server" keystoreFile="/path/domainname.prefix.jks " keystorePass="your_keystore_password" />

Note: If you are using a version of Tomcat prior to Tomcat 7, you need to change “keystorePass” to “keypass”.

  1. Save your changes to the server.xml file.
  2. Restart Tomcat.


Error while Installing the Client Agent on Ubuntu and Debian Linux – unexpected operator

Errors like this:

/opt/CA/ABuagent/uagentsetup: 74: [: -e: unexpected operator
/opt/CA/ABcmagt/caagent: 60: cd: can’t cd to /nls
/opt/CA/ABcmagt/aglang_setup: 60: [: -e: unexpected operator
/opt/CA/ABcmagt/caagentsetup: 54: [: -e: unexpected operator

While installing CA Arcserve R16.5, can be resolve by changing /bin/sh linking from dash to bash.

You can check the linking of /bin/sh, with this commands:

ls –l /bin/sh

If you get:

lrwxrwxrwx 1 root root 4 Feb  7 19:41 /bin/sh -> dash

You have this problem.
Change the linking is easy, just reconfigure dash

dpkg-reconfigure dash

Select No, to Install dash as /bin/sh

Once this is changed you should be able to install the agent or start the agent fine.