Category Archives: Citrix

Restart Explorer as Adminstrator

If you have problems with accessing a drive, with the error message: f:\ is not accessible. Access is denied

It can happen, if the drive doesn’t have this permission:
Everyone (This folder Only):

  • Read & Execute
  • List folder contents
  • Read

To access the drive, you need restart Explorer as administrator.

Find Explorer.exe as the user you are login as. In this example the username is admin_sofi, and kill it by right click on it and choice “End Task”

After start CMD as administrator, and write this command:
c:\windows\explorer.exe /NOACCHECK

After this you can see that explorer.exe is now running in “Elevated”

Deny Dropbox from running with GPO

Start Group Policy Management Editor
Go to:
Computer Configuration\Policies\Windows Settings\Security Settings\Software Restriction Policies

If you see:

Dropbox1

On the right screen, then you need to right click on Software Restriction Policies, and choice “New Software Restricition Policies” first.

Right click on
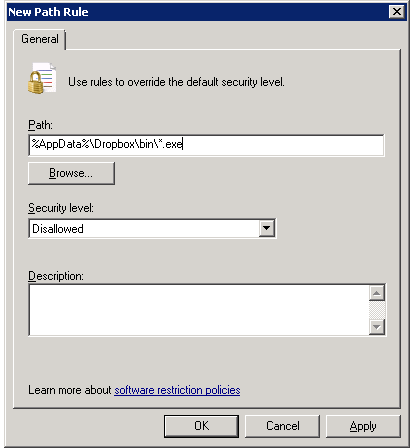
Additional Rules, and choice “New Path Rule…”

Path should be:
%AppData%\Dropbox\bin\*.exe
Set security level to Disallowed
Dropbox2

Make a another new Path rule, and set path to:
%AppData%\Roaming\Dropbox\bin\*.exe

Set security level to Disallowed

To update GPO right away:
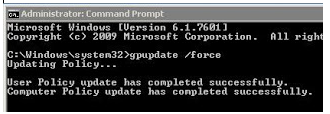
Run CMD as Administrator, and type: gpupdate /force
Dropbox3

This will update the group policy on the machine this command is run at.

Citrix XenDesktop – Desktop Popsup with connection and then closes

Today i have this problem, that my brand new setup of XenDesktop just start and showing connecting, but just after a few seconds just drop the connection, and the VDI is restarting.

So I push the connect buttom and when it shows connecting, i put the machine in maintaince mode, so it is not restarting automatic.

Then look at the Event Viewer, and it was showing this error:
Source: Citrix ICA Service
Event ID: 1260
Type: Warning
Description: ICA connection is cancelled because auto-logon is enforced and auto-logon failed.
For more information, see
http://support.citrix.com/proddocs/topic/online-plugin-121-windows/ica-sson-enable.html.

When look at the support.citrix.com page I got a 404 error page.

Search the Internet and found at that my user account dosent was permitted to logon locally, enable this though Group Policy
Group Policy here: Computer Configuration -> Policies -> Windows Settings -> Security Settings -> Local Policies -> User Rights Assignment -> Allow log on locally

By default the following users and groups are granted to log on locally on windows 7:
Guest
Administrators
Users
Backup Operatiors

XenServer: Powershell

If you like Powershell, you will like the XenServer Powershell.

Download XenServer SDK from the Citrix.com download page (You need to logon with you Citrix credentitals)

After you have install Citrix Xenserver Powershell, you can test to see if it have been install by running this comands:

Get-PSSnapin -registered

If it installed, you can add it to you powershell session by typing this command:

Add-PSSnapin Xen*

To connect to the XenServer

Connect-XenServer -Url https://<ServerIP>

To get all vm on the Xenserver:

Get-XenServer:VM

To only show the VM with VDI in the middle of the name

Get-XenServer:VM -name *vdi*

To see all command from XenServer Powershell

Get-Command -module Xen*


See more commands here:

http://kennethdalbjerg.dk/wp-content/uploads/2013/05/Citrix_XenServer_6.0_CmdLet_Poster.pdf
http://www.qa.com/about-qa/blogs/2012/july/citrix-xenserver-6-and-powershell/

XenServer: Add an extra Core to a CPU Socket

You can’t add extra Core to a CPU socket though XenCenter, you need to start you console of the XenServer.

To Add 4 Core in each CPU Socket you need to run this commands:

xe vm-param-set platform:cores-per-socket=4 uuid=<VM UUID>

To found the vm’s UUID, you can use these commands:

xe vm-list name-label=<Name of the VM>

After you have put 4 core in each CPU socket you also need to run these commands:

xe vm-param-set VCPUs-max=8 uuid=<VM UUID>
xe vm-param-set VCPUs-at-startup=8 uuid=<VM UUID>

This will add 8 CPU in totalt, but only 2 CPU socket with each 4 Core.

Web interface and the black drop down enable

In default the Bkack Drop Down is not enabled, in webinterface.

To enable it, do this:

  • On the Delivery Services server, navigate to: C:\inetpub\wwwroot\Citrix.
  • Open the folder that represents the desired Store (example: Store1).
  • With Notepad, open webinterface.conf.
  • Search for the showDesktopViewer attribute.
  • Change the attribute value from off to on.

Citrix XenApp failed to connect to Data Store

Today i have this problems on one of the Citrix XenApp servers, that the service IMA won’t connect to the Data store.

It failed with this events:

1. Citrix XenApp failed to connect to the Data Store. ODBC error while connecting to the database: S1000 -> [Microsoft][ODBC Microsoft Access Driver] Cannot open database ‘(unknown)’.  It may not be a database that your application recognizes, or the file may be corrupt.

2. Failed to load plugin C:\Program Files (x86)\Citrix\System32\Citrix\IMA\SubSystems\ImaPsSs.dll with error IMA_RESULT_FAILURE

3. Failed to load plugin C:\Program Files (x86)\Citrix\System32\Citrix\IMA\SubSystems\ImaRuntimeSS.dll with error IMA_RESULT_FAILURE

4. Failed to load initial plugins with error IMA_RESULT_FAILURE

5. The Citrix Independent Management Architecture service terminated with service-specific error 2147483649 (0×80000001).


But all my others servers in the farm was working just fine, so it must be a locally problems.
The Local Host Cache database, is used to allow a Citrix server in the Citrix Farm to pursue working if the server loses acces to date store temporay. The Local Host Cache database, is an Microsoft Access database, named lmalhc.mdb, and it store ind the Independent Mangement Architecture folder, located: <ProgramFiles>\Citrix\Independent Management Architecture\


So the solution to this problems must be to recreate the LHC database, this can be done with this command

dsmaint recreatelhc

But first check that

The datastore is available and function okay, and that the Citrix IMA Service is down :).

The command performs these actions:

Rename the existing Local Host Cache database, create a new one, and the setting PSRequired in registry to 1. Under HKEY_LOCAL_MACHINE\SOFTWARE\Citrix\IMA\Runtime\

Setting thise key to, force the server to connect to the data store, so that the Local Host Cache database, can be recreated.

Kill a stuck vm in shuting down mode or pending mode

There are 3 options to do this, witch way depend on the stuck mode, start with options 1 and work you way thougt it onto the vm is shutdown.

Options 1:

SSH to the Xenserver witch running the vm

Type these commands:

xe task-list

Found the task and the UUID for this task, and kill it

xe task-cancel force=true uuid=<UUID>

 Options 2:

SSH to the Xenserver witch running the vm

xe vm-list

Find the vm han get the UUID

list_domains | grep <UUID>

Get the number in front of the UUID

/opt/xensource/debug/destroy_domain -domid <DOMID>

Options 3:

SSH to the Xenserver witch running the vm

xe-toolstack-restart


XenCenter – Failed to import

I have a problem with my Xencenter failed to import a OVF VM.
In XenCenter console, it just says: Failed to import.

If i look in the log files is was saying: (In XenCenter Console, push tab Help, and then clock on “View application log files. And then open op XenCenter.log):

System.Exception: Failed to import. —> System.IO.InvalidDataException: Failed to add resource Hard Disk Image. —> System.Exception: Failed to import. —> System.Exception: Failed to import virtual disk file. —> System.Xml.XmlException: Root element is missing.

Error on a Danish windows

System.Exception: Failed to import. —> System.IO.InvalidDataException: Failed to add resource Hard Disk Image. —> System.Exception: Failed to import. —> System.Exception: Failed to import virtual disk file. —> System.Xml.XmlException: Rod element mangler.

To fix this problem I did:
In XenCenter, select View -> Hidden Objects
This will show you hidden objects, such as Transfer objects.
Found the failed imported machine, right click on it and delete it.
Now you should found a XenServer Tranfer VM X.X.X-X, right click on it and delete it.

Now connect to the console on the XenServer host: (Master of the pool if you have such one)
And type this commands:

cd /opt/xensource/packages/files/transfer-vm
./install-transfer-vm.sh