Checking IIS Authentication Settings Before and After Changes

When maintaining Exchange Server or other IIS-based applications, configuration changes — such as cumulative updates, patches, or manual adjustments — can sometimes alter authentication settings without notice.
These changes may lead to unexpected login prompts, authentication failures, or inconsistent client access.

To help detect and document such changes, I use a simple but powerful PowerShell script that captures IIS authentication settings before and after any updates or modifications.

How the Script Works

The script queries IIS and exports the current authentication configuration to a CSV file.
After performing your updates (for example, applying an Exchange CU or modifying a virtual directory), you run the script again to generate a second CSV snapshot.

Each CSV contains detailed authentication settings for every relevant IIS site and virtual directory — including Windows, Basic, OAuth, and other authentication providers.

You can then use PowerShell’s built-in Compare-Object command to identify any differences between the two CSV files:

Compare-Object (Import-Csv .\Auth-Before.csv) (Import-Csv .\Auth-After.csv) -Property Site,Path,AuthType,Enabled

This comparison highlights exactly which authentication settings have changed, allowing administrators to verify that everything still aligns with best practices and organizational standards.

Why This Is Useful

Authentication misconfigurations can be subtle — and difficult to diagnose once users begin reporting access issues.
By documenting authentication settings before and after maintenance, you gain:

  • Full visibility into IIS authentication changes.
  • Quick detection of unexpected configuration drift.
  • Simplified troubleshooting after updates or patching.
  • A reliable audit trail for compliance and change management.

Practical Example

Before installing a new Exchange cumulative update, you run the script and save the output as Auth-Before.csv.
After the update completes, you run it again to create Auth-After.csv.
By comparing the two files, you instantly see whether any authentication methods were enabled, disabled, or modified — all without manually checking dozens of virtual directories.

n summary:
This PowerShell script provides a simple, reliable way to monitor and compare IIS authentication settings before and after system changes — helping administrators maintain consistent, secure configurations and avoid service disruptions.

<#
.SYNOPSIS
  Extended local snapshot of IIS Authentication and Extended Protection (EP) settings per site/app/vdir on an Exchange server.

.DESCRIPTION
  Scans all IIS sites, applications, and virtual directories, and collects:
    • Anonymous / Basic / Windows / Digest authentication status (enabled/disabled)
    • Windows authentication providers (NTLM / Negotiate order)
    • Basic authentication realm (if configured)
    • SSL flags (Require SSL / client certificate mode)
    • Extended Protection settings (tokenChecking, flags, SPNs)
    • (Optional) Exchange virtual directories (OWA, ECP, EWS, Autodiscover, MAPI, ActiveSync, OAB, Outlook Anywhere)

  Also performs a brief risk assessment regarding reverse proxy (e.g. NetScaler) compatibility with Extended Protection settings.

  Output is saved in C:\CNXA\IIS-Auth-Snapshots\<timestamp> as CSV, JSON, and SUMMARY.txt.

.PARAMETER OutputRoot
  Root output folder. Default: C:\CNXA\IIS-Auth-Snapshots

.PARAMETER IncludeExchangeVdirs
  Include Exchange virtual directories (OWA, ECP, EWS, Autodiscover, MAPI, ActiveSync, OAB, Outlook Anywhere) if corresponding cmdlets are available.
#>

[CmdletBinding()]
param(
  [string]$OutputRoot = 'C:\CNXA\IIS-Auth-Snapshots',
  [switch]$IncludeExchangeVdirs
)

begin {
  $ErrorActionPreference = 'Stop'
  Import-Module WebAdministration -ErrorAction Stop

  $timestamp = (Get-Date).ToString('yyyy-MM-ddTHH-mm-ss')
  $runRoot   = Join-Path $OutputRoot $timestamp
  New-Item -ItemType Directory -Path $runRoot -Force | Out-Null
  Write-Host ("Snapshot folder: {0}" -f $runRoot) -ForegroundColor Cyan

  function Get-AuthInfo([string]$Location, [string]$PathType) {
    $row = [ordered]@{
      Location  = $Location
      PathType  = $PathType   # Site / App / VDir
      anonymousAuthentication = $null
      basicAuthentication     = $null
      windowsAuthentication   = $null
      digestAuthentication    = $null
      windowsProviders        = $null
      basicRealm              = $null
      sslFlags                = $null
      ep_tokenChecking        = $null   # None/Allow/Require (IIS viser ofte: Off/Accept/Require)
      ep_flags                = $null   # None/Proxy/ProxyCohosting/NoServiceNameCheck
      ep_spns                 = $null   # Semi-kolon-separeret liste
      Risk_NetScaler_EP       = $null   # Heuristik: EP + sandsynlig proxy = risiko
      Error                   = $null
    }

    try {
      foreach($name in 'anonymousAuthentication','basicAuthentication','windowsAuthentication','digestAuthentication'){
        try {
          $state = (Get-WebConfigurationProperty -PSPath IIS:\ -Location $Location -Filter "system.webServer/security/authentication/$name" -Name enabled -ErrorAction Stop).Value
          $row[$name] = [bool]$state
        } catch { $row[$name] = $null }
      }
      # Providers for Windows auth
      try {
        $providers = (Get-WebConfiguration -PSPath IIS:\ -Location $Location -Filter 'system.webServer/security/authentication/windowsAuthentication/providers').Collection |
                     ForEach-Object { $_.Value }
        $row['windowsProviders'] = ($providers -join ',')
      } catch { $row['windowsProviders'] = $null }
      # Basic realm
      try {
        $realm = (Get-WebConfigurationProperty -PSPath IIS:\ -Location $Location -Filter 'system.webServer/security/authentication/basicAuthentication' -Name 'realm' -ErrorAction Stop).Value
        $row['basicRealm'] = $realm
      } catch { $row['basicRealm'] = $null }
      # SSL flags
      try {
        $flags = (Get-WebConfigurationProperty -PSPath IIS:\ -Location $Location -Filter 'system.webServer/security/access' -Name 'sslFlags' -ErrorAction Stop).Value
        $row['sslFlags'] = $flags
      } catch { $row['sslFlags'] = $null }

      # Extended Protection (under windowsAuthentication/extendedProtection)
      try {
        $epBase = 'system.webServer/security/authentication/windowsAuthentication/extendedProtection'
        $token  = (Get-WebConfigurationProperty -PSPath IIS:\ -Location $Location -Filter $epBase -Name 'tokenChecking' -ErrorAction Stop).Value
        $flags2 = (Get-WebConfigurationProperty -PSPath IIS:\ -Location $Location -Filter $epBase -Name 'flags' -ErrorAction Stop).Value
        $spnCol = (Get-WebConfiguration -PSPath IIS:\ -Location $Location -Filter ($epBase + '/spn')).Collection
        $spns   = @(); if($spnCol){ $spns = $spnCol | ForEach-Object { $_.Value } }
        $row['ep_tokenChecking'] = $token
        $row['ep_flags']         = $flags2
        $row['ep_spns']          = ($spns -join ';')
      } catch {
        # Hvis noderne ikke findes, lader vi felter være null
      }

      # Heuristik for risiko bag reverse proxy: Hvis WindowsAuth=On og EP tokenChecking er 'Require' eller flags indeholder 'Proxy', så marker risiko
      if($row.windowsAuthentication -and ($row.ep_tokenChecking -match 'Require' -or ($row.ep_flags -and $row.ep_flags -match 'Proxy'))){
        $row.Risk_NetScaler_EP = $true
      } else {
        $row.Risk_NetScaler_EP = $false
      }
    }
    catch { $row['Error'] = $_.Exception.Message }

    return [pscustomobject]$row
  }
}

process {
  $rows = @()

  # Sites
  $sites = Get-Website | Sort-Object Name
  foreach($s in $sites){
    $rows += Get-AuthInfo -Location $s.Name -PathType 'Site'

    # Apps
    $apps = Get-WebApplication -Site $s.Name -ErrorAction SilentlyContinue
    foreach($a in $apps){
      $loc = "$($s.Name)$($a.Path)"
      $rows += Get-AuthInfo -Location $loc -PathType 'App'

      # VDirs under app
      $vdirs = Get-WebVirtualDirectory -Site $s.Name -Application $a.Path -ErrorAction SilentlyContinue
      foreach($v in $vdirs){
        $loc2 = "$($s.Name)$($v.Path)"
        $rows += Get-AuthInfo -Location $loc2 -PathType 'VDir'
      }
    }

    # Root VDirs (hvis ingen apps)
    $rootVdirs = Get-WebVirtualDirectory -Site $s.Name -Application '/' -ErrorAction SilentlyContinue
    foreach($rv in $rootVdirs){
      $loc3 = "$($s.Name)$($rv.Path)"
      $rows += Get-AuthInfo -Location $loc3 -PathType 'VDir'
    }
  }

  # Gem IIS-auth + EP
  $csvPath  = Join-Path $runRoot 'iis-auth.csv'
  $jsonPath = Join-Path $runRoot 'iis-auth.json'
  $rows | Export-Csv -NoTypeInformation -Encoding UTF8 -Path $csvPath
  $rows | ConvertTo-Json -Depth 5 | Set-Content -Path $jsonPath -Encoding UTF8
  Write-Host ("IIS auth skrevet: {0}" -f $csvPath) -ForegroundColor Green

  # Lidt opsummering og fokus på EP + velkendte Exchange-kataloger
  $summary = New-Object System.Text.StringBuilder
  [void]$summary.AppendLine("IIS Auth / Extended Protection Snapshot - " + $timestamp)
  [void]$summary.AppendLine("")

  $hot = $rows | Where-Object { $_.Risk_NetScaler_EP -eq $true }
  if($hot.Count -gt 0){
    [void]$summary.AppendLine("!! Potentielle problemer bag reverse proxy (EP Require/Proxy + WindowsAuth):")
    $hot | Select-Object Location,PathType,windowsAuthentication,ep_tokenChecking,ep_flags,sslFlags | Format-Table | Out-String | ForEach-Object { [void]$summary.Append($_) }
  } else {
    [void]$summary.AppendLine("Ingen åbenlyse EP/Proxy-risici fundet baseret på heuristik.")
  }

  $summaryPath = Join-Path $runRoot 'SUMMARY.txt'
  $summary.ToString() | Set-Content -Path $summaryPath -Encoding UTF8

  if($IncludeExchangeVdirs){
    if(Get-Command Get-OwaVirtualDirectory -ErrorAction SilentlyContinue){
      $ex = [ordered]@{}
      $ex.OWA  = Get-OwaVirtualDirectory              | Select-Object Server,Name,InternalUrl,ExternalUrl,FormsAuthentication,BasicAuthentication,WindowsAuthentication,OAuthAuthentication,RequireSSL
      $ex.ECP  = Get-EcpVirtualDirectory              | Select-Object Server,Name,InternalUrl,ExternalUrl,FormsAuthentication,BasicAuthentication,WindowsAuthentication,OAuthAuthentication,RequireSSL
      $ex.EWS  = Get-WebServicesVirtualDirectory      | Select-Object Server,Name,InternalUrl,ExternalUrl,BasicAuthentication,WindowsAuthentication,OAuthAuthentication,RequireSSL
      $ex.Auto = Get-AutodiscoverVirtualDirectory     | Select-Object Server,Name,InternalUrl,ExternalUrl,WindowsAuthentication,OAuthAuthentication,RequireSSL
      $ex.MAPI = Get-MapiVirtualDirectory             | Select-Object Server,Name,InternalUrl,ExternalUrl,IISAuthenticationMethods,RequireSSL
      $ex.AS   = Get-ActiveSyncVirtualDirectory       | Select-Object Server,Name,InternalUrl,ExternalUrl,BasicAuthentication,WindowsAuthentication,ClientCertAuth,ExternalAuthenticationMethods,RequireSSL
      $ex.OAB  = Get-OabVirtualDirectory              | Select-Object Server,Name,InternalUrl,ExternalUrl,RequireSSL
      $ex.OA   = Get-OutlookAnywhere                  | Select-Object Server,Name,ExternalHostname,InternalHostname,SSLOffloading,ExternalClientAuthenticationMethod,InternalClientAuthenticationMethod,IISAuthenticationMethods

      # Flatten for CSV
      $exRows = @()
      foreach($k in $ex.Keys){ if($null -ne $ex[$k]){ $exRows += $ex[$k] | Select-Object * } }
      if($exRows.Count -gt 0){
        $exCsv  = Join-Path $runRoot 'exchange-vdirs.csv'
        $exJson = Join-Path $runRoot 'exchange-vdirs.json'
        $exRows | Export-Csv -NoTypeInformation -Encoding UTF8 -Path $exCsv
        $ex     | ConvertTo-Json -Depth 6 | Set-Content -Path $exJson -Encoding UTF8
        Write-Host ("Exchange VDirs skrevet: {0}" -f $exCsv) -ForegroundColor Green
      } else {
        Set-Content -Path (Join-Path $runRoot 'exchange-vdirs.txt') -Value 'No Exchange VDirs returned.'
      }
    } else {
      Set-Content -Path (Join-Path $runRoot 'exchange-vdirs.txt') -Value 'Exchange cmdlets not found; skipping.'
    }
  }
}

end {
  # no-op
}
Automating Exchange Autodiscover Configuration During Server Installations

I recently came across a brilliant PowerShell script from Jeff Guillet (MCSM | MVP) that solves a problem many Exchange administrators know all too well — incorrect Autodiscover configurations being pushed to clients after a new server installation.
This issue often leads to certificate errors, Outlook connection issues, and unnecessary troubleshooting. Jeff’s script automates the entire process, ensuring a seamless experience for both users and admins.

The Challenge

When deploying new Microsoft Exchange servers, it’s easy for clients to receive outdated or incorrect Autodiscover URLs. This happens because new servers may register default service connection points (SCPs) before administrators have a chance to manually configure them.
As a result, Outlook clients can encounter certificate warnings or connect to the wrong Exchange instance — especially in coexistence or migration environments.

About the Script

Jeff Guillet’s PowerShell script automatically handles this configuration work for you. It monitors Active Directory and updates all relevant settings as soon as a new Exchange server is detected. This ensures your environment stays consistent and users never experience Autodiscover-related issues.

When a new server is installed, the script:

  • Updates the Autodiscover Service Connection Point (SCP) in Active Directory.
  • Configures the Outlook Anywhere (RPC over HTTP) FQDNs.
  • Sets the correct virtual directory URLs (EWS, OAB, ECP, MAPI, etc.) based on your preferred domain names.

This automation prevents Autodiscover from pointing to the wrong server and eliminates common certificate mismatch errors.

Why It Matters

Maintaining consistent Autodiscover and virtual directory configurations across all Exchange servers is essential for a stable environment. With this script in place, administrators can:

  • Prevent Outlook certificate pop-ups and connection failures.
  • Automate repetitive post-installation tasks.
  • Simplify coexistence during Exchange upgrades or migrations.
  • Ensure a reliable user experience with minimal manual intervention.

Real-World Benefits

For organizations managing hybrid or multi-server Exchange environments, Jeff’s script is a huge time-saver. It ensures every newly installed Exchange server immediately conforms to your organization’s configuration standards — all without lifting a finger.

By automating these critical steps, you reduce human error, improve reliability, and maintain consistent connectivity across the board.

In summary:
This PowerShell script by Jeff Guillet (MCSM | MVP) automatically updates the Autodiscover SCP, Outlook Anywhere FQDNs, and Exchange virtual directory URLs as new servers are deployed — helping administrators avoid certificate errors and streamline their deployment workflow.

For more information or to download the script, visit Jeff’s blog at www.expta.com or contact him directly at [email protected] / @expta on Twitter.

<#
.SYNOPSIS
Sets the Autodiscover service connection point (SCP) in Active Directory, Outlook Anywhere FQDNs, and virtual directory URLs for new Exchange servers as they are being installed.

Author/Copyright:    Jeff Guillet, MCSM | MVP - All rights reserved
Email/Blog/Twitter:  [email protected] | www.expta.com | @expta

THIS CODE IS MADE AVAILABLE AS IS, WITHOUT WARRANTY OF ANY KIND. THE ENTIRE RISK OF THE USE OR THE RESULTS FROM THE USE OF THIS CODE REMAINS WITH THE USER.

.NOTES
Version 1.0, October 7, 2015
Version 2.0, July 22, 2016

Revision History
---------------------------------------------------------------------
1.0	Initial release
1.1	Updated online link; Added code to install RSAT-AD-PowerShell if required
2.0	Major update:
		Made setting the new values easier by cloning an existing server
		Now also configures Outlook Anywhere and Exchange virtual directory internal and external URLs
		Revised verbiage and use *-ClientAccessService cmdlets for Exchange 2016
		Added -Verbose output to display the values we're configuring
		Improved overall display output
	
.DESCRIPTION
Sets the Autodiscover service connection point (SCP) in Active Directory, Outlook Anywhere FQDNs, and virtual directory URLs for new Exchange servers as they are being installed.

Exchange setup always configures the new SCP with the FQDN of the server which throws certificate warnings in Outlook because the self-signed Exchange certificate is not trusted. Read https://blogs.technet.microsoft.com/exchange/2015/11/18/exchange-active-directory-deployment-site for more information about this behavior.

This script should be run from an existing Exchange server of the same version, and is designed to be run while the new Exchange server is being installed. It loops until it finds an existing SCP for the target server and then configures it to match the same SCP and virtual directory URL values from the server to clone.

.PARAMETER Server
Specifies the Exchange 2010/2013/2016 server to configure.

.PARAMETER ServerToClone
Specifies the Exchange 2010/2013/2016 server to use for reference. The SCP, Outlook Anywhere, and internal/external URL values will be copied from this server to the target server.

.PARAMETER DomainController
Query and set on the specified domain controller, otherwise uses the current binding DC.

.LINK
http://www.expta.com/2016/07/new-set-autodiscoverscp-v2-script-is-on.html

.EXAMPLE
PS C:\>Set-AutodiscoverSCP.ps1 -Server exch02 -ServerToClone exch01

This command continually queries the current configuration domain controller until it finds an SCP for server EXCH02 and then sets it to match the SCP of EXCH01. It also configures Outlook Anywhere and the internal/external virtual directory URLs to match those found on EXCH01.

.EXAMPLE
PS C:\>Set-AutodiscoverSCP.ps1 -Server exch02 -ServerToClone exch01 -DomainController dc03

This command is almost the same as the command in the previous example, except it continually queries DC03 for the SCP record and configures it on that domain controller. This is useful when configuring a new Exchange server in a different Active Directory site.
#>

# Define the script parameters
Param (
	[CmdletBinding()]
	[Parameter(Position=1,Mandatory=$true)]
	[string]$Server,
	[Parameter(Position=2,Mandatory=$true)]
	[string]$ServerToClone,
	[Parameter(Position=3,Mandatory=$false)]
	[string]$DomainController
)

Process {
	# Validate the target server
	$ErrorActionPreference = "SilentlyContinue"
	$Server = $Server.ToUpper()
	$Ping = New-Object System.Net.NetworkInformation.Ping
	$Reply = $Ping.Send($Server).Status
	if ($Reply -ne "Success") {
		Write-Host "ERROR: $Server is not online or is not a valid server name." -Foreground Red
		Exit(1)
	}

	# Validate the server to clone
	$ServerToClone = $ServerToClone.ToUpper()
	$Reply = $null
	$Reply = $Ping.Send($ServerToClone).Status
	if ($Reply -ne "Success") {
		Write-Host "ERROR: $ServerToClone is not online or is not a valid server name." -Foreground Red
		Exit(1)
	}

	# Select the Domain Controller to run against
	if ($DomainController) { 
		if ((Get-WindowsFeature RSAT-AD-PowerShell).InstallState -eq "Available") {
			Add-WindowsFeature RSAT-AD-PowerShell
		}
		Import-Module ActiveDirectory
		$Error.Clear()
		$DomainController = (Get-ADDomainController $DomainController).HostName
		$DomainController = $DomainController.ToUpper()
		If ($Error) { 
			Write-Host "ERROR: $DomainController is not online or is not a valid domain controller." -Foreground Red
			Exit(1)
		}
	}
	else {
		$DomainController = (Get-ADServerSettings).DefaultConfigurationDomainController.Domain
	}

	# Discover where the PSSession is established and show Exchange version warning
	$PSSessionServer = Get-ExchangeServer (Get-PSSession | Where-Object {$_.State -eq 'Opened'}).ComputerName
	if ($PSSessionServer.AdminDisplayVersion.Major -eq 14) { $ExVersion = "2010" }
	if ($PSSessionServer.AdminDisplayVersion.Major -eq 15 -and $PSSessionServer.AdminDisplayVersion.Minor -eq 0) { $ExVersion = "2013" }
	if ($PSSessionServer.AdminDisplayVersion.Major -eq 15 -and $PSSessionServer.AdminDisplayVersion.Minor -eq 1) { $ExVersion = "2016" }
	if ($ExVersion -eq $null) {
		Write-Host "ERROR: This script must be run from the Exchange Management Shell on an Exchange 2010-2016 server." -Foreground Red
		Exit(1)
	}
	elseif ($ExVersion -eq "2010") {
		Write-Host "This script is currently running in an Exchange 2010 PowerShell session. Make sure $Server is installing Exchange 2010." -Foreground White -BackGround Red
		if ((Get-OwaVirtualDirectory -Server $ServerToClone -DomainController $DomainController -ADPropertiesOnly).InternalUrl.AbsoluteUri -eq $null) {
			Write-Host "ERROR: $ServerToClone is a higher version of Exchange than this server." -Foreground Red
			Exit(1)
		}
		Write-Host "NOTE: If you're installing your first Exchange 2013/2016 server in this environment you should run this script from that server while setup is running."
		Write-Host
	}
	else {
		Write-Host "This script is currently running in an Exchange $ExVersion PowerShell session. Make sure $Server is installing Exchange 2013 or later." -Foreground White -BackGround Red
		Write-Host
	}
	$ErrorActionPreference = "Continue"

	# Get the SCP, Outlook Anywhere, and virtual directory URL values from $ServerToClone
	Write-Host -NoNewline "Gathering SCP, Outlook Anywhere, and Exchange virtual directory values from $ServerToClone... " -Foreground White
	$SCPValue = (Get-ClientAccessServer $ServerToClone -DomainController $DomainController -ErrorAction SilentlyContinue -WarningAction SilentlyContinue).AutoDiscoverServiceInternalUri.AbsoluteUri
	$EasInternal = (Get-ActiveSyncVirtualDirectory -Server $ServerToClone -DomainController $DomainController -ADPropertiesOnly).InternalUrl.AbsoluteUri
	$EasExternal = (Get-ActiveSyncVirtualDirectory -Server $ServerToClone -DomainController $DomainController -ADPropertiesOnly).ExternalUrl.AbsoluteUri
	$EcpInternal = (Get-EcpVirtualDirectory -Server $ServerToClone -DomainController $DomainController -ADPropertiesOnly).InternalUrl.AbsoluteUri
	$EcpExternal = (Get-EcpVirtualDirectory -Server $ServerToClone -DomainController $DomainController -ADPropertiesOnly).ExternalUrl.AbsoluteUri
	If ($ExVersion -ne "2010") {
		$MapiInternal = (Get-MapiVirtualDirectory -Server $ServerToClone -DomainController $DomainController -ADPropertiesOnly).InternalUrl.AbsoluteUri
		$MapiExternal = (Get-MapiVirtualDirectory -Server $ServerToClone -DomainController $DomainController -ADPropertiesOnly).ExternalUrl.AbsoluteUri
	}
	$OabInternal = (Get-OabVirtualDirectory -Server $ServerToClone -DomainController $DomainController -ADPropertiesOnly).InternalUrl.AbsoluteUri
	$OabExternal = (Get-OabVirtualDirectory -Server $ServerToClone -DomainController $DomainController -ADPropertiesOnly).ExternalUrl.AbsoluteUri
	$OwaInternal = (Get-OwaVirtualDirectory -Server $ServerToClone -DomainController $DomainController -ADPropertiesOnly).InternalUrl.AbsoluteUri
	$OwaExternal = (Get-OwaVirtualDirectory -Server $ServerToClone -DomainController $DomainController -ADPropertiesOnly).ExternalUrl.AbsoluteUri
	$EwsInternal = (Get-WebServicesVirtualDirectory -Server $ServerToClone -DomainController $DomainController -ADPropertiesOnly).InternalUrl.AbsoluteUri
	$EwsExternal = (Get-WebServicesVirtualDirectory -Server $ServerToClone -DomainController $DomainController -ADPropertiesOnly).ExternalUrl.AbsoluteUri
	$OaInternal = (Get-OutlookAnywhere -Server $ServerToClone -DomainController $DomainController -AdPropertiesOnly).InternalHostname.HostnameString
	$OaExternal = (Get-OutlookAnywhere -Server $ServerToClone -DomainController $DomainController -AdPropertiesOnly).ExternalHostname.HostnameString
	Write-Host "Done!" -Foreground White

	# Verbose output shows cloned values
	Write-Verbose "SCP -  $SCPValue"
	Write-Verbose "EAS -  $EasInternal | $EasExternal"
	Write-Verbose "ECP -  $EcpInternal | $EcpExternal"
	Write-Verbose "MAPI - $MapiInternal | $MapiExternal"
	Write-Verbose "OAB -  $OabInternal | $OabExternal"
	Write-Verbose "OWA -  $OwaInternal | $OwaExternal"
	Write-Verbose "EWS -  $EwsInternal | $EwsExternal"
	Write-Verbose "OA -   $OaInternal | $OaExternal"

	# Check if we're running this script from the target server
	if ([System.Net.Dns]::GetHostByName($Server).HostName -eq [System.Net.Dns]::GetHostByName(($env:computerName)).HostName) {
		Write-Host
		Write-Host "NOTE: You are running this script from the same server you're configuring. If you're running it while installing Exchange the script may stall during configuration since setup restarts IIS and web services several times. If that happens simply CTRL-C and restart the script." -Foreground Yellow
		Write-Host
	}

	# Continually query AD for SCP value for $Server
	do {
		if ($ExVersion -eq "2016") {
			$SCP = (Get-ClientAccessService $Server -DomainController $DomainController -ErrorAction SilentlyContinue).AutoDiscoverServiceInternalUri.AbsoluteUri
		}
		else {
			$SCP = (Get-ClientAccessServer $Server -DomainController $DomainController -ErrorAction SilentlyContinue).AutoDiscoverServiceInternalUri.AbsoluteUri
		}
		$PercentComplete++
		if ($PercentComplete -eq 101) { $PercentComplete = 1 }
		Write-Progress -Activity "Searching for the SCP value for Exchange server $Server in Active Directory..." -PercentComplete $PercentComplete -Status "Please wait."
	}
	until ($SCP -ne $null)

	# Set the new SCP value in Active Directory
	$Error.Clear()
	if ($ExVersion -eq "2016") {
		Set-ClientAccessService $Server -AutoDiscoverServiceInternalUri $SCPValue -DomainController $DomainController
	}
	else {
		Set-ClientAccessServer $Server -AutoDiscoverServiceInternalUri $SCPValue -DomainController $DomainController
	}
	If ($Error) { Exit(1) }
	Write-Host "Setting SCP value for $Server to $SCPValue" -Foreground Green

	# Set the internal and external URLs for all virtual directories
	Write-Host -NoNewLine "Setting ActiveSyncVirtualDirectory internal and external URLs... " -Foreground Cyan
	Get-ActiveSyncVirtualDirectory -Server $Server -DomainController $DomainController -ADPropertiesOnly | Set-ActiveSyncVirtualDirectory -InternalUrl $EasInternal -ExternalUrl $EasExternal -DomainController $DomainController -WarningAction SilentlyContinue
	Write-Host "Done!" -Foreground Cyan
	Write-Host -NoNewLine "Setting EcpVirtualDirectory internal and external URLs... " -Foreground Cyan
	Get-EcpVirtualDirectory -Server $Server -DomainController $DomainController -ADPropertiesOnly | Set-EcpVirtualDirectory -InternalUrl $EcpInternal -ExternalUrl $EcpExternal -DomainController $DomainController -WarningAction SilentlyContinue
	Write-Host "Done!" -Foreground Cyan
	If ($MapiInternal -ne $null) {
		Write-Host -NoNewLine "Setting MapiVirtualDirectory internal and external URLs... " -Foreground Cyan
		Get-MapiVirtualDirectory -Server $Server -DomainController $DomainController -ADPropertiesOnly | Set-MapiVirtualDirectory -InternalUrl $MapiInternal -ExternalUrl $MapiExternal -DomainController $DomainController -WarningAction SilentlyContinue
		Write-Host "Done!" -Foreground Cyan
	}
	Write-Host -NoNewLine "Setting OabVirtualDirectory internal and external URLs... " -Foreground Cyan
	Get-OabVirtualDirectory -Server $Server -DomainController $DomainController -ADPropertiesOnly | Set-OabVirtualDirectory -InternalUrl $OabInternal -ExternalUrl $OabExternal -DomainController $DomainController -WarningAction SilentlyContinue
	Write-Host "Done!" -Foreground Cyan
	Write-Host -NoNewLine "Setting OwaVirtualDirectory internal and external URLs... " -Foreground Cyan
	Get-OwaVirtualDirectory -Server $Server -DomainController $DomainController -ADPropertiesOnly | Set-OwaVirtualDirectory -InternalUrl $OwaInternal -ExternalUrl $OwaExternal -DomainController $DomainController -WarningAction SilentlyContinue
	Write-Host "Done!" -Foreground Cyan
	Write-Host -NoNewLine "Setting WebServicesVirtualDirectory internal and external URLs... " -Foreground Cyan
	Get-WebServicesVirtualDirectory -Server $Server -DomainController $DomainController -ADPropertiesOnly | Set-WebServicesVirtualDirectory -InternalUrl $EwsInternal -ExternalUrl $EwsExternal -DomainController $DomainController -WarningAction SilentlyContinue
	Write-Host "Done!" -Foreground Cyan
	Write-Host -NoNewLine "Setting Outlook Anywhere FQDNs... " -Foreground White
	$OA = Get-OutlookAnywhere -Server $Server -DomainController $DomainController -AdPropertiesOnly
	If ($ExVersion -ne "2010") {
		$OA | Set-OutlookAnywhere -InternalHostname $OaInternal -InternalClientsRequireSsl $OA.InternalClientsRequireSsl -InternalClientAuthenticationMethod $OA.InternalClientAuthenticationMethod -ExternalHostname $OaExternal -ExternalClientsRequireSsl $OA.ExternalClientsRequireSsl -ExternalClientAuthenticationMethod $OA.ExternalClientAuthenticationMethod -DomainController $DomainController -WarningAction SilentlyContinue
	}
	else {
		$OA | Set-OutlookAnywhere -ExternalHostname $OAExternal -DomainController $DomainController -WarningAction SilentlyContinue
	}
	Write-Host "Done!" -Foreground White
	Write-Host
	Write-Host "Be sure to install and enable the same trusted SSL certificate that's configured on $Server to complete configuration." -Foreground Red
}

Fixing SAML Authentication Failure After FortiGate Upgrade with Microsoft Entra ID – Firewall Authentication Failed

A quick post on what broke after a FortiGate firmware upgrade—and the one setting that fixed it.

After upgrading a FortiGate firewall to the latest firmware, I ran into an unexpected problem:
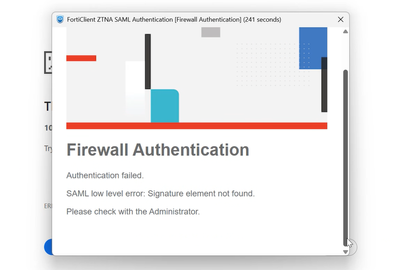
SAML authentication suddenly stopped working for users signing in via
Microsoft Entra ID (formerly Azure AD). The configuration looked intact—certificates were present,
the SAML setup was unchanged—yet logins kept failing.
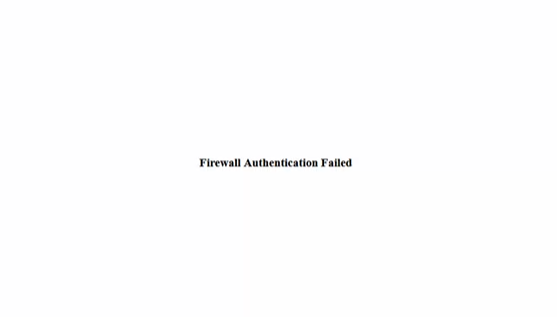
Forticlient users, will get Firewall Authentication Failed


It wasn’t a lost configuration or a certificate mismatch. It turned out to be a change in
how SAML assertions are validated in the newest FortiGate versions when
Microsoft Entra ID is the Identity Provider (IdP).

The Root Cause
The latest FortiGate firmware expects the IdP to sign both the SAML response and the SAML assertion.
If your Entra ID configuration only signs the response (which used to be sufficient), authentication will fail
after the upgrade.

The Fix (Microsoft Entra ID setting)

  • Open the Microsoft Entra admin center and go to your Enterprise application for FortiGate.
  • Navigate to Single sign-on → SAML Certificates → SAML Signing Certificate → Edit.
  • Under Signing option, select: Sign SAML response and assertion.
  • Save the change and test authentication again.
  • Once this option was enabled, users were able to authenticate successfully again.

    Why This Matters
    Requiring signatures on both the response and the assertion strengthens the integrity of the SAML flow:
    FortiGate can verify not only the envelope (response) but also the identity claims (assertion).
    This improves security, but it may catch existing deployments by surprise after an upgrade.

    Takeaway

    • If SAML breaks after a FortiGate firmware upgrade with Entra ID as IdP, don’t assume your configuration is lost.
    • Enable “Sign SAML response and assertion” in Microsoft Entra ID for the affected application.
    • Re-test sign-in—authentication should start working immediately.

    Reference
    Fortinet community article on post-upgrade SAML issues:
    Troubleshooting Tip – SAML Authentication fails after firmware upgrade

    Tip: If you manage multiple FortiGate clusters, note this requirement in your upgrade checklist to avoid surprise outages.

    Linux Docker contrainer and PRTG

    Simple script to monitor that all docker container is running, and report the status back to PRTG
    It return 1 if the docker is running, or else it will return 0.

    #!/bin/bash
    echo  "<prtg>"
    #dockerlist_arr=( $(docker ps -a) )
    readarray -t dockerlist_arr < <( docker ps -a | awk '{print $NF}' | tail -n +2 )
    for i in "${dockerlist_arr[@]}"
    do
       echo "<result>"
       echo "<channel>$i</channel>"
       if [ "$( docker container inspect -f '{{.State.Running}}' $i )" = "true" ]; then
            echo "<value>1</value>"
       else
            echo "<value>0</value>"
       fi
       echo "<LimitMode>1</LimitMode>"
       echo "<LimitMaxError>1</LimitMaxError>"
       echo "<LimitMinError>1</LimitMinError>"
       echo "</result>"
    # or do whatever with individual element of the array
    done
    echo "</prtg>"
    

    VMware and Powershell

    Broadcom the owner and vendor of VMWare have release a new powershell module, called VCF.PowerCLI instead of the vmware PowerCLI.
    If you computer is online, you can installed it with the powershell command Install-Module

    Install-Module -Name VCF.PowerCLI

    If yours computer/server is not online, you can download it from another computer, and installed it though the manuel way, please look here: https://developer.broadcom.com/powercli/installation-guide

    When upgradering from Vmware PowerCLI – Throubleshooting
    If you allready have Vmware PowerCLI installed on the computer, you may encounter the following error when trying to install VCF.PowerCLI

    PackageManagement\Install-Package : The following commands are already available on this system

    This happens because some of the commandlets which are part of the PowerCLI SDK have been moved to other modules. To resolve the conflict you need to add the AllowClobber parameter to Install-Module

    Install-Module -Name VCF.PowerCLI -AllowClobber

    AllowClobber overrides warning messages about installation conflicts about existing commands on a computer. Overwrites existing commands that have the same name as commands being installed by a module. AllowClobber and Force can be used together in an Install-Module command.

    Extend a debian/ubuntu partition on a virtual machine.

    This is howto extend a virtual machine drive running Debian / Ubuntu
    1. First you need to make sure that there are no snapshot of the VM. If there are snapshot, you can extend the drive in either vmWare or Hyper-V.
    2. If the server is running Hyper-v, you can’t extend an IDE drive. If it are an IDE device, you need to turn of the computer first.
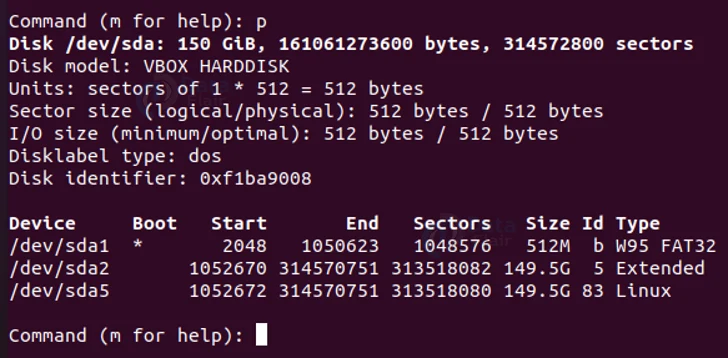
    3. Make sure that the partition is not an extended partition. If it are you can still extend it, but then this guide won’t work for you. Run fdisk -l /dev/sdX
    4. Make sure that the drive is not an LVM storage. Then you can’t used this guide.

    The above image, showes that there are an extend partition.

    After you have checked, that there are no snapshot, the drive is not an IDE and it the last partition on the drive that needed to extend. Then goes to yours hypervisor and extend the drive, with the amount of storage you will like to have the drive extend with.

    Then back on the linux server, install the package cloud-guest-utils, with this command

    apt install cloud-guest-utils

    Then run these commands:

    ls /sys/class/scsi_host/ | while read host ; do echo "- - -" > /sys/class/scsi_host/$host/scan ; done
    ls /sys/class/scsi_device/ | while read host ; do echo 1 > /sys/class/scsi_device/$host/device/rescan ; done

    This will rescan the SCSI bus for new drive and drive extension.

    After you have run the rescan you should extend the partition you want to extend

    growpart /dev/sda 2

    This commands will extend partition 2 on /dev/sda with the amount of free space on the drive, after partition 2.

    After the partition have been extended, you need to extend the filesystem. This can be done by resize2fs

    resize2fs /dev/sda2


    Selfsign with Windows Certification Authority

    If you just create a certificate, and it signed by a Windows Certification Authority, the certs is working just fine in the old Internet Explorer, but Chrome/Firefox and the new Edge browser will failed, with Common Name invalid, the precise error in Chrome is: NET::ERR_CERT_COMMON_NAME_INVALID.

    This is because a normal certificate request, does not included a subject alternative name.
    So to fix this you new to request the certficate, by an inf file instead

    So first create a new Certreq.inf file and paste this into it:

    ;----------------- request.inf -----------------
    [Version]
    
    Signature="$Windows NT$"
    
    [NewRequest]
    
    Subject = "CN=kennethdalbjerg.dk, OU=Hosting, O=KennethDalbjerg, L=DK, S=DK, C=DK" ; replace attribues in this line
    KeySpec = 1
    KeyLength = 2048
    ; Can be 2048, 4096, 8192, or 16384.
    ; Larger key sizes are more secure, but have
    ; a greater impact on performance.
    Exportable = TRUE
    FriendlyName = "Kennethdalbjerg.dk-2024"
    MachineKeySet = TRUE
    SMIME = False
    PrivateKeyArchive = FALSE
    UserProtected = FALSE
    UseExistingKeySet = FALSE
    ProviderName = "Microsoft Strong Cryptographic Provider"
    ProviderType = 12
    RequestType = PKCS10
    KeyUsage = 0xa0
    
    [EnhancedKeyUsageExtension]
    
    OID=1.3.6.1.5.5.7.3.1 ; this is for Server Authentication
    
    [RequestAttributes]
    
    SAN="kennethdalbjerg.dk&dns=www.kennethdalbjerg.dk"
    ;-----------------------------------------------

    Replace kennethdalbjerg.dk and www.kennethdalbjerg.dk, with the name you want. If you don’t want more than one common name, in yours certificate. Then you just in last line remove:
    &dns=www.kennethdalbjerg.dk
    Also replace the name in FriendlyName.

    Now run this command to prepare the CSR file:

    certreq -new certreq.inf certreq.csr

    Copy the certreq.csr to yours Certication Authority server, and the run this command on that server

    certreq -Submit -Attrib "CertificateTemplate:webserver" -Config - c:\certreq.txt

    Replace CertificateTemplate:webserver with the correct name for the template that you want to use.
    Save the certificate by name, i use signcert.cer
    Copy signcert.cert back to the server, that you have generate the CSR file on, and run this command on that server

    certreq -accept signcert.cer


    Problems in connection to a Webservice from Windows Server 2016 / 2019

    Today, I have this issue, that i could not connect to a webservices, that are hosted by the Danish Tax Service, the URL where: https://emcstest.skat.dk
    I got this warning:

    Invoke-WebRequest : The request was aborted: Could not create SSL/TLS secure channel.

    When running these commands

    [Net.ServicePointManager]::SecurityProtocol = [Net.SecurityProtocolType]::Tls12
    $WebResponse = Invoke-WebRequest "https://emcstest.skat.dk"

    No matter what I did. But final I tested the webpage against SSLLabs
    https://www.ssllabs.com/ssltest/analyze.html?d=emcstest.skat.dk
    Found these ciphers

    I then run these commands:

    Enable-TlsCipherSuite TLS_ECDHE_RSA_WITH_AES_128_GCM_SHA256
    Enable-TlsCipherSuite TLS_ECDHE_RSA_WITH_AES_256_GCM_SHA384
    Enable-TlsCipherSuite TLS_ECDHE_RSA_WITH_CHACHA20_POLY1305_SHA256
    Enable-TlsCipherSuite TLS_AES_256_GCM_SHA384
    Enable-TlsCipherSuite TLS_AES_128_GCM_SHA256
    Enable-TlsCipherSuite TLS_CHACHA20_POLY1305_SHA256
    Enable-TlsCipherSuite TLS_AES_256_GCM_SHA384

    And finally I where able to access the webpage though powershell.

    Problems with FortiClient and no traffic after succesful connection

    I have just help a customer, with a problem with his FortiClient.
    The Forticlient did connect successful, and everything looks good, but there are no traffic iis recieved.

    The OS of the customer where Windows 11.

    The solutions where quite simple, just uninstall this microsoft update: KB2693643
    Read more about the error here: https://community.fortinet.com/t5/FortiClient/Troubleshooting-Tip-VPN-SSL-connected-but-no-IP-address-in/ta-p/248143