Category Archives: Windows

Change autodiscover URL (EWS URL / OAB URL / ECP URL / Activesync URL) – Exchange 2010

If you want to change Autodiscover / EWS / OAB / OWA / ECP / Activesync Url, this is how it works

Set-WebServicesVirtualDirectory -Identity “SERVERNAME\EWS (Default Web Site)” -InternalUrl https://INTERNALURL/EWS/Exchange.asmx -externalurl https://EXTERNALURL/EWS/Exchange.asmx -BasicAuthentication:$true

Set-AutoDiscoverVirtualDirectory -Identity "SERVERNAME\Autodiscover (Default Web Site)" -internalurl https://INTERNALURL/autodiscover/autodiscover.xml -externalurl https://EXTERNALURL/autodiscover/autodiscover.xml

set-OabVirtualDirectory -identity "SERVERNAME\OAB (Default Web Site)" -internalurl https://INTERNALURL/OAB -externalurl https://EXTERNALURL/OAB

set-EcpVirtualDirectory -identity "SERVERNAME\ecp (Default Web Site)" -internalurl https://INTERNALURL/ecp -externalurl https://EXTERNALURL/ecp

set-OwaVirtualDirectory -identity "SERVERNAME\owa (Default Web Site)" -internalurl https://INTERNALURL/owa -externalurl https://EXTERNALURL/owa

set-ActiveSyncVirtualDirectory  -identity "SERVERNAME\Microsoft-Server-ActiveSync (Default Web Site)" -internalurl https://INTERNALURL/Microsoft-Server-ActiveSync -externalurl https://EXTERNALURL/Microsoft-Server-ActiveSync

Set-ClientAccessServer -Identity "SERVERNAME" –AutoDiscoverServiceInternalUri https://INTERNALURL/autodiscover/autodiscover.xml

Or if this is a single server installation you can do it like this:

get-WebServicesVirtualDirectory | Set-WebServicesVirtualDirectory -InternalUrl https://INTERNALURL/EWS/Exchange.asmx -externalurl https://EXTERNALURL/EWS/Exchange.asmx -BasicAuthentication:$true

get-AutoDiscoverVirtualDirectory | Set-AutoDiscoverVirtualDirectory -internalurl https://INTERNALURL/autodiscover/autodiscover.xml -externalurl https://EXTERNALURL/autodiscover/autodiscover.xml

get-OabVirtualDirectory | set-OabVirtualDirectory -internalurl https://INTERNALURL/OAB -externalurl https://EXTERNALURL/OAB

get-EcpVirtualDirectory | set-EcpVirtualDirectory -internalurl https://INTERNALURL/ecp -externalurl https://EXTERNALURL/ecp

get-OwaVirtualDirectory | set-OwaVirtualDirectory -internalurl https://INTERNALURL/owa -externalurl https://EXTERNALURL/owa

get-ActiveSyncVirtualDirectory | set-ActiveSyncVirtualDirectory  -internalurl https://INTERNALURL/Microsoft-Server-ActiveSync -externalurl https://EXTERNALURL/Microsoft-Server-ActiveSync

get-ClientAccessServer | Set-ClientAccessServer  –AutoDiscoverServiceInternalUri https://INTERNALURL/autodiscover/autodiscover.xml

Get mailboxes and witch groups there are member of

I need to get all mailboxes, and witch group there are member of.

You need Quest ActiveRoles Management Shell for this to work:
http://www.quest.com/powershell/activeroles-server.aspx

Add-PSSnapin Quest.ActiveRoles.ADManagement -ErrorAction SilentlyContinue

$File = "C:\groupslog.txt"
$Mailboxes = Get-mailbox -resultsize unlimited | select sAMAccountName,name,alias
$Mailboxes | ForEach {
   $User = Get-QADUser -samaccountname $_.sAMAccountName | Select sAMAccountName, memberOf
   $Line = $_.sAMAccountName
   ForEach ($GroupDN In $User.memberOf)
   {
      $Group = (Get-QADGroup $GroupDN | Select sAMAccountName).sAMAccountName
      $Line = "$Line,$Group"
   }
   echo $Line
} | out-File $File

In the file c:\groupslog.txt each line is a mailbox, and the first entry is the sAMAccountName, and each entry after this is the group the Mailbox is member of.

Stop error 0xc0000225 on P2V’d Windows 2008 R2

I have P2V a windows 2008 R2, from Xenserver to vmware.

But after the first good boot, it come with: Status: 0xc0000225, Info: The boot selection failed because a required device is inaccessible.

The machine will startup just fine one time, first i thougt it was the uninstall of XenServer tools?.
So i try to remove the Xenserver tools, before the P2V, but again i godt 0xC000225 error again.

I then google it, and found this post: http://web2.minasi.com/forum/topic.asp?TOPIC_ID=31980, and the fix was pretty simple:

  • Mount the Windows 2008 R2DVD in VMware and boot the virtual machine, with CDRom boot at the first boot device.
  • Hit any key to boot from the CDRrom.
  • At the first screen of the installation (Language Selection), you can hit Shift-F10 to get a command prompt.
  • Type Regedit at the command prompt.
  • Loaded hive HKEY_LOCAL_MACHINE (which mounts as a sub-hive)
    1. Highlight HKEY_LOCAL_MACHINE
    2. File > Load Hive
    3. Select < c: > \Windows\System32\config\system (name it something like “qwerty”)
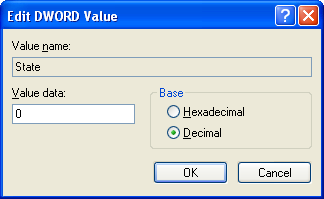
  • Expand HKEY_LOCAL_MACHINE\qwerty\ControlSet001\Services\intelide
  • Change the data for value “Start” from “3” to “0”.
  • File > Unload Hive.
  • Exit regedit.
  • Reboot the VM.


Citrix Xendesktop optimize for Windows 7 – Optimization Guide

The link for downloading the PDF of the Citrix Xendesktop Guide, to optimize Windows 7 for using it with Xendesktop, can be found here: http://support.citrix.com/servlet/KbServlet/download/25161-102-648286/XD%20-%20Windows%207%20Optimization%20Guide.pdf

The services in danish name is:

English guide name Danish name
Background Intellingent Transfer Service BITS (Background Intellingent Transfer Service)
Desktop Windows Manager Session Manager Sessionshåndtering af Styring af skrivebordsvindue
Function Discovery Resource Publication Udgivelse af funktionsregistreringsressourcer
HomeGroup listener Lyttefunktion til hjemmegruppe
HomeGroup Provider Udbyder af hjemmegruppe
Indexing Service Indexing Service
Offine Files OfflineFiler
Security Center Sikkerhedscenter
SuperFetch Superfetch
System Restore System Gendannelse
Themes Temaer
Windows Defender Windows Defender
Windows Media Player Sharing Service Windows Media Player Network Sharing Service
Windows Search Windows Search


Lost trust on my Exchange 2010 after revert to a older snapshot

I was returing to an older snapshot of my Exchange servers. But when i want to logon to the Exchange server, it came with “Trust relationship has been lost with domain controller”.

Normally you just rejoin the domain, but this is not a good idea, when there is installed Exchange services on it.

I fix this with netdom.
Logon to the Exchange with a locally logon account.
Start command with Administrator rights
Type: netdom /RESETPWD /server:DOMAINCONTROLLER /UserD:DOMAINNAME\ACCOUNTNAME /PasswordD:PASSWORD OR *

Exchange 2010, show permission on all folders in all mailboxes

Here is a script, that runs though you Exchange server, and return all permission on all folders in all mailboxes.

The script needs to be running from the Exchange management Shell, and will create a subfolder in c:\ call ExchangeMailboxPermission, where it will create a text file for all yours mailboxes.

#This script will return all permissions on all folders
#in all mailboxes
#
#Written by Kenneth Dalbjerg - http://www.kennethdalbjerg.dk
#
$FolderPath = 'C:\ExchangeMailboxPermission\'
if ((Test-Path -path $FolderPath) -ne $True)
{
New-Item $FolderPath -type directory
}

$mailboxes = get-mailbox -resultsize unlimited
foreach ($mailbox in $mailboxes) {
$alias = $mailbox.DistinguishedName
$username = $mailbox.SamAccountName
$SpecialExchangeFolders = "Top of Information Store|Recoverable Items|Deletions|Purges|Versions"
$mailboxfolderes = Get-MailboxFolderStatistics -folderscope all -identity $alias | where { $_.name-notmatch $SpecialExchangeFolders }
$File = $FolderPath + '\' + $username + '.txt'
$mailboxfolderes | foreach {
$folder = $username + ':' + $_.folderpath -replace "/","\"
echo $folder
Get-MailboxFolderPermission -identity $folder
} | Out-file $File
}

Exchange 2010, powershell full access and send-as permission

To get a CSV file, from you exchange with full access and send as permission, from all you mailboxes run these commands:

Full Access

Get-Mailbox | Get-MailboxPermission | where {$_.user.tostring() -ne “NT AUTHORITY\SELF” -and $_.IsInherited -eq $false} | Select Identity,User,@{Name=’Access Rights’;Expression={[string]::join(‘, ‘, $_.AccessRights)}} | Export-Csv -NoTypeInformation c:\mailboxpermissions.csv

Send As

Get-Mailbox | Get-ADPermission | where { ($_.ExtendedRights -like “*Send-As*”) -and ($_.IsInherited -eq $false) -and -not ($_.User -like “NT AUTHORITY\SELF”) } | Select Identity, User, Deny | Export-CSVc:\sendas.csv

Citrix Provisioning Server “An unexpected MAPI error occurred.” when you try to change an image mode

When you change the mode from private to standard, you may get this error: “An unexpected MAPI error occurred.”. If you click on “More details”, there stand: ”Failed to map vDisk, no Driver.”.

The solution to this problem could be, changing the the Microsoft Volume Licensing, from KMS to ether None og MAK. And then push the OK buttom. If its work you can just change the Microsoft Volume Licensing back to KMS.


There is not enough space available on the disk(s) to complete this operation

When you want to resize the disk in Windows 7, server 2008 or server 2008 R2, you might get this warning:

Error: there is not enough space available on the disk(s) to complete this operation

This could be fixed by the following guides:

  1. Right click on my computer
  2. Click on Manage
  3. Goto storage
  4. Click on Disk management
  5. Right click on disk management and click on rescan disks
  6. Try to resize the disk again

Change SQL Collation

Steps for chaning Collation:

  1. Take backup of Databases and logins.
  2. Detach all databases execpt system databases. (All users databases)
  3. Find the SQL server installation path (Root of the CD)
  4. Run this command:
    Setup /QUIET /ACTION=REBUILDDATABASE /INSTANCENAME=MSSQLServer /SAPWD=Qwerty123 /SQLSYSADMINACCOUNTS=”administrator” /SQLCollation=SQL_Scandinavian_Cp850_CS_AS

/QUIET – Run it as a sillent installation

/action – We are running rebuilddatabase to change the server collation

/Instancename – withs instance do you want to change collation on.

/SAPPW -SA password for this instance

/SQLSYSADMINACCOUNTS – An administration account, normally the run you are running this from. The user should be administrator of the SQL Server

/SQLCollation – withs collation should you change to.