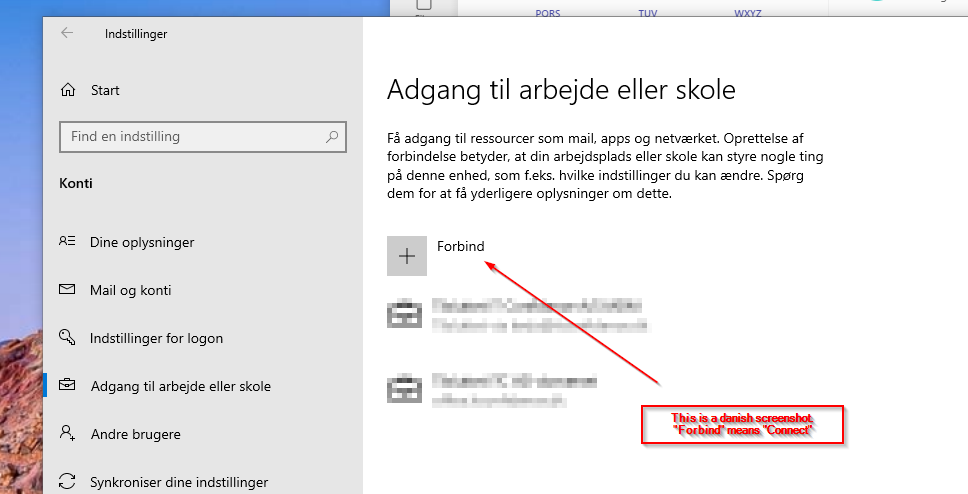
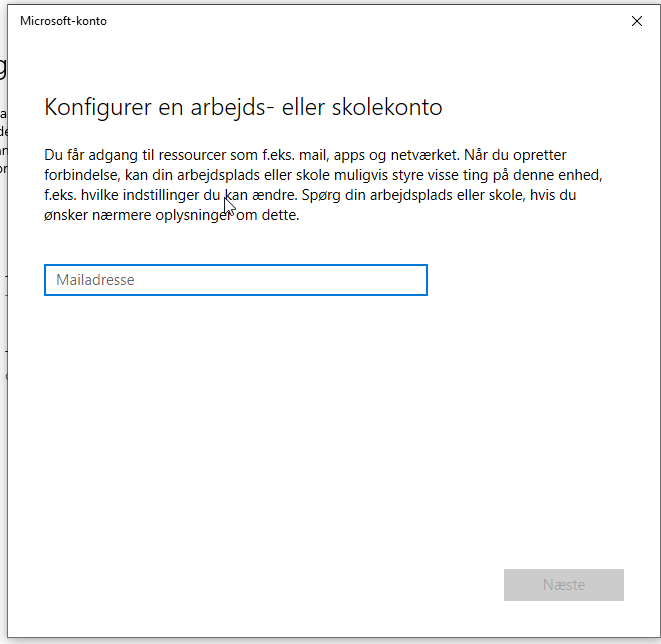
When going to Settings -> Accounts -> Access work or school, og push the “connect” buttom. I could just see that the popup, asking for my mail address, just popup, but then disapear again very quick.
Starting a powershell with administrative rights, and type in the command
If you have vmware ESXi or Microsoft Hyper-v, you can expand a disk, from the hypervisor console, very simple. But afterwards the partition the servers is not expand. It is always a good idea to create a Snapshot/checkpoint before. Just remember, that the disc can’t be expanded in Hyper-v when there are a checkpoint. So first expand the disk in Hyper-v and then create a snapshot.
To do this you first need to rescan the disk for change
echo "1" > /sys/class/block/sda/device/rescan
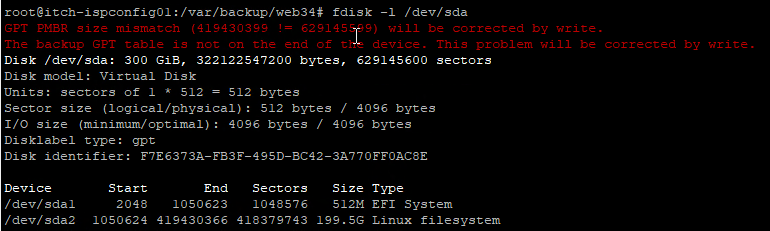
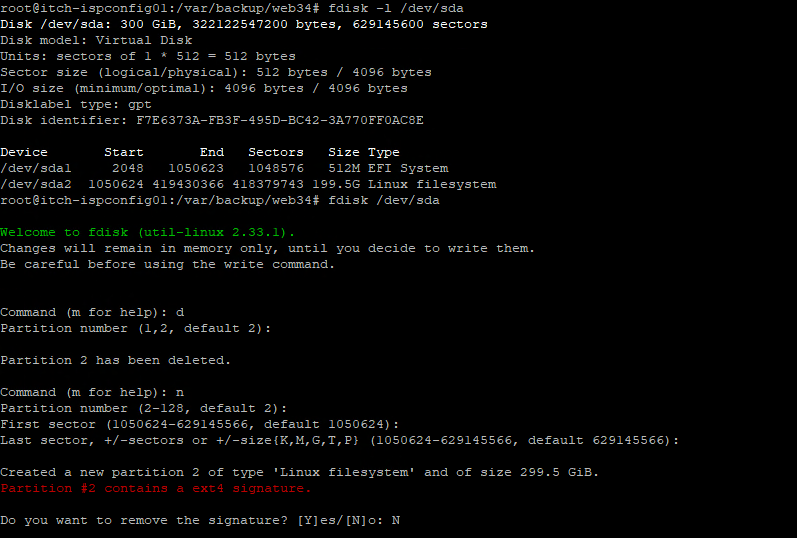
Replace sda with the disk name. Then you can run fdisk -l /dev/sda, to see the disk information, if you got an error on the top like in the screenshot below
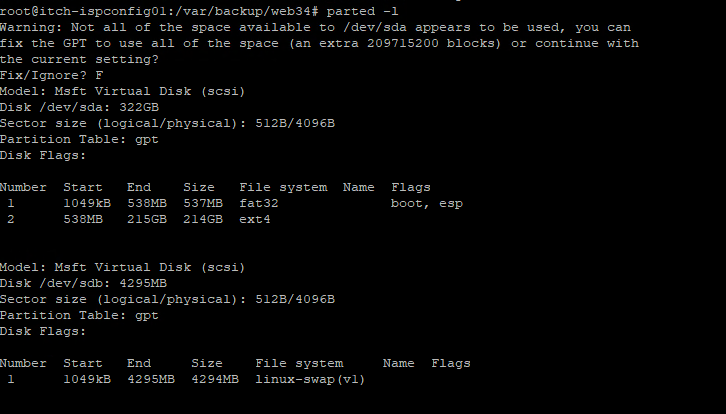
Then you need to repair the disk partition table.
parted -l
After you have check the partition table, you need to delete the old partition, and recreate it
This is done by type fdisk /dev/sda
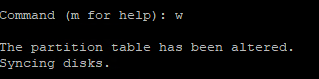
In the fdisk, you type d to delete, choice the partition, in the example is two. (Beaware that this guide can only be used to expand the last partition on the disk, if you have multiple) Then you type n to create a new one, and just goes for the default once settings. In the end type N to not remove the signature.
Then you w to save the settings
Then we just have to resize the ext4 information on the disk, this is done by the command resize2fs
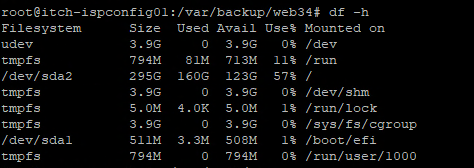
Afterwards you can check that the server have been expand by the command df -h
You can use this command to see the status of the Raid Controller and Raidset.
storcli /c0 show
Generating detailed summary of the adapter, it may take a while to complete.

Controller = 0
Status = Success
Description = None

Product Name = Intel(R) RAID Controller RS3DC080
Serial Number = SK94678290
SAS Address =  500605b00f7ef7e0
PCI Address = 00:b5:00:00
System Time = 03/18/2022 15:44:57
Mfg. Date = 11/24/19
Controller Time = 03/18/2022 15:44:29
FW Package Build = 24.21.0-0126
BIOS Version = 6.36.00.3_4.19.08.00_0x06180203
FW Version = 4.680.00-8519
Driver Name = lsi-mr3
Driver Version = 7.702.13.00
Current Personality = RAID-Mode
Vendor Id = 0x1000
Device Id = 0x5D
SubVendor Id = 0x8086
SubDevice Id = 0x9360
Host Interface = PCI-E
Device Interface = SATA-3G
Bus Number = 181
Device Number = 0
Function Number = 0
Drive Groups = 1

TOPOLOGY :
========

-----------------------------------------------------------------------------
DG Arr Row EID:Slot DID Type  State BT       Size PDC  PI SED DS3  FSpace TR
-----------------------------------------------------------------------------
 0 -   -   -        -   RAID5 Optl  N    5.451 TB dflt N  N   dflt N      N
 0 0   -   -        -   RAID5 Optl  N    5.451 TB dflt N  N   dflt N      N
 0 0   0   252:4    8   DRIVE Onln  N  930.390 GB dflt N  N   dflt -      N
 0 0   1   252:5    9   DRIVE Onln  N  930.390 GB dflt N  N   dflt -      N
 0 0   2   252:6    10  DRIVE Onln  N  930.390 GB dflt N  N   dflt -      N
 0 0   3   252:7    11  DRIVE Onln  N  930.390 GB dflt N  N   dflt -      N
 0 0   4   252:0    15  DRIVE Onln  N  930.390 GB dflt N  N   dflt -      N
 0 0   5   252:1    12  DRIVE Onln  N  930.390 GB dflt N  N   dflt -      N
 0 0   6   252:2    13  DRIVE Onln  N  930.390 GB dflt N  N   dflt -      N
-----------------------------------------------------------------------------

DG=Disk Group Index|Arr=Array Index|Row=Row Index|EID=Enclosure Device ID
DID=Device ID|Type=Drive Type|Onln=Online|Rbld=Rebuild|Dgrd=Degraded
Pdgd=Partially degraded|Offln=Offline|BT=Background Task Active
PDC=PD Cache|PI=Protection Info|SED=Self Encrypting Drive|Frgn=Foreign
DS3=Dimmer Switch 3|dflt=Default|Msng=Missing|FSpace=Free Space Present
TR=Transport Ready

Virtual Drives = 1

VD LIST :
=======

-------------------------------------------------------------
DG/VD TYPE  State Access Consist Cache Cac sCC     Size Name
-------------------------------------------------------------
0/0   RAID5 Optl  RW     Yes     RWBD  -   ON  5.451 TB
-------------------------------------------------------------

EID=Enclosure Device ID| VD=Virtual Drive| DG=Drive Group|Rec=Recovery
Cac=CacheCade|OfLn=OffLine|Pdgd=Partially Degraded|Dgrd=Degraded
Optl=Optimal|RO=Read Only|RW=Read Write|HD=Hidden|TRANS=TransportReady|B=Blocked|
Consist=Consistent|R=Read Ahead Always|NR=No Read Ahead|WB=WriteBack|
AWB=Always WriteBack|WT=WriteThrough|C=Cached IO|D=Direct IO|sCC=Scheduled
Check Consistency

Physical Drives = 8

PD LIST :
=======

-------------------------------------------------------------------------------------
EID:Slt DID State DG       Size Intf Med SED PI SeSz Model                   Sp Type
-------------------------------------------------------------------------------------
252:0    15 Onln   0 930.390 GB SATA SSD N   N  512B Samsung SSD 870 QVO 1TB U  -
252:1    12 Onln   0 930.390 GB SATA SSD N   N  512B Samsung SSD 870 QVO 1TB U  -
252:2    13 Onln   0 930.390 GB SATA SSD N   N  512B Samsung SSD 870 QVO 1TB U  -
252:3    14 UGood  - 930.390 GB SATA SSD N   N  512B Samsung SSD 870 QVO 1TB U  -
252:4     8 Onln   0 930.390 GB SATA SSD N   N  512B Samsung SSD 860 EVO 1TB U  -
252:5     9 Onln   0 930.390 GB SATA SSD N   N  512B Samsung SSD 860 EVO 1TB U  -
252:6    10 Onln   0 930.390 GB SATA SSD N   N  512B Samsung SSD 860 EVO 1TB U  -
252:7    11 Onln   0 930.390 GB SATA SSD N   N  512B Samsung SSD 860 EVO 1TB U  -
-------------------------------------------------------------------------------------

EID=Enclosure Device ID|Slt=Slot No.|DID=Device ID|DG=DriveGroup
DHS=Dedicated Hot Spare|UGood=Unconfigured Good|GHS=Global Hotspare
UBad=Unconfigured Bad|Onln=Online|Offln=Offline|Intf=Interface
Med=Media Type|SED=Self Encryptive Drive|PI=Protection Info
SeSz=Sector Size|Sp=Spun|U=Up|D=Down|T=Transition|F=Foreign
UGUnsp=Unsupported|UGShld=UnConfigured shielded|HSPShld=Hotspare shielded
CFShld=Configured shielded|Cpybck=CopyBack|CBShld=Copyback Shielded


Cachevault_Info :
===============

---------------------------------------------------------
Model  State   Temp Mode MfgDate    Next Learn
---------------------------------------------------------
CVPM02 Optimal 23C  -    2020/04/09 2022/03/31  00:41:59
---------------------------------------------------------
Here you can see under PD List, that drive 252:3 14 stand as UGood. Thats the new disk i have put into the server, and have been detected by the raidset.
To include this disk into the array that you see under VD List, you need to do this
This will add the disk to the raidset. This can takes hours and even days, if you have a big raidset. You can check the status with this command:
storcli /c0/v0 show migrate
Controller = 0
Status = Success
Description = None


VD Operation Status :
===================

------------------------------------------------------------
VD Operation      Progress% Status      Estimated Time Left
------------------------------------------------------------
 0 Reconstruction         2 In progress 9 Hours 52 Minutes
------------------------------------------------------------

DG=Arrays | Slot=Drive Bay No|VD=Virtual Drive/Logical Drive|EID=Enclosure Device ID
Here you can see that it will take 9 hours and 52 minutes to complete the Reconstruction
When it done with the reconstuction, the command from before will output this:
VD Operation Status :
===================

-----------------------------------------------------------
VD Operation Progress% Status          Estimated Time Left
-----------------------------------------------------------
 0 Migrate   -         Not in progress -
-----------------------------------------------------------
And then you can check the array with the command from the top of this guide
storcli /c0 show
After this you need to change the partition table, and then expand the volume.
If you ever need to see the status of a running jobs, this TSQL can be very helpfull
SELECT sj.name
   , sja.*
FROM msdb.dbo.sysjobactivity AS sja
INNER JOIN msdb.dbo.sysjobs AS sj ON sja.job_id = sj.job_id
WHERE sja.start_execution_date IS NOT NULL
   AND sja.stop_execution_date IS NULL
If you wan to know the sync status of a always On availability group database replication, this command can be used:
SELECT
	ar.replica_server_name,
	adc.database_name,
	ag.name AS ag_name,
	drs.is_local,
	drs.is_primary_replica,
	drs.synchronization_state_desc,
	drs.is_commit_participant,
	drs.synchronization_health_desc,
	drs.recovery_lsn,
	drs.truncation_lsn,
	drs.last_sent_lsn,
	drs.last_sent_time,
	drs.last_received_lsn,
	drs.last_received_time,
	drs.last_hardened_lsn,
	drs.last_hardened_time,
	drs.last_redone_lsn,
	drs.last_redone_time,
	drs.log_send_queue_size,
	drs.log_send_rate,
	drs.redo_queue_size,
	drs.redo_rate,
	drs.filestream_send_rate,
	drs.end_of_log_lsn,
	drs.last_commit_lsn,
	drs.last_commit_time
FROM sys.dm_hadr_database_replica_states AS drs
INNER JOIN sys.availability_databases_cluster AS adc
	ON drs.group_id = adc.group_id AND
	drs.group_database_id = adc.group_database_id
INNER JOIN sys.availability_groups AS ag
	ON ag.group_id = drs.group_id
INNER JOIN sys.availability_replicas AS ar
	ON drs.group_id = ar.group_id AND
	drs.replica_id = ar.replica_id
ORDER BY
	ag.name,
	ar.replica_server_name,
	adc.database_name;
If you ever have installed a new Exchange server in an Active Directory orgainisation that allready have an Exchange server (That’s not so often anymore), you may have discovered that users get Certificate warning in Outlook, unto you have changed the URL’s to match the certificates.
It copy the settings of all IIS url’s to the new Exchange server, when it found it in Active Directory. So run this script before the start of the installation, and you will not receive the certificate warnings after the installation.