SQL Query:
SELECT @@version as 'server version'

Select SERVERPROPERTY('COLLATION') as 'server collation'
Powershell: Get all email aliases for a mailbox account on Exchange 2007/2010
Get-Mailbox -id KennethDalbjerg | select-expand EmailAddresses | %{$_.SmtpAddress}
Problems with GPO and mapped network drive and shortcut
Today i have to create a GPO with a shortcut to an already mapped network drive.
Both the Shortcut and the mapped Network drive is created by GPO.
The mapped network drive mapped fine, but the shortcut wasen’t created at all. The Event viewer toll me that that the shortcut could not be created because the file was not found.
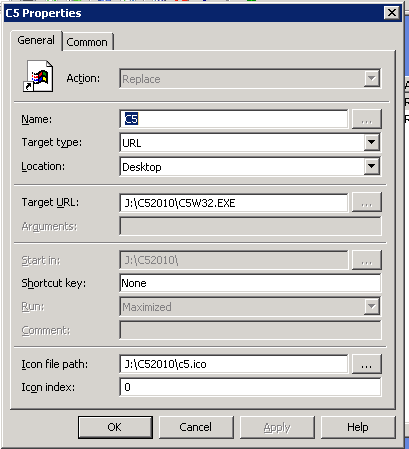
Instead of using File System object, i created a URL Shortcut, still to the exe file. This works, but now the icon was a Internet Explorer Icon.
In GPO you can customize the icon, under icon file path
Terminal server, Redirected folders and PDF Creator problems
Today i have installed the programs PDF Creator on a Terminal servers, Windows 2008 R2. But it will only run under the administrators account.
Some search for errors lead me to that it could be that PDF Creator creates is temp files under <temp>\PDFCreator, but my user have redirected folders, so it was under a network shares. It seams that PDFCreator have some troubles with this, so I change the temp location in the registry database, and its now working for my users.
You need to change:
KEY_CURRENT_USER\Software\PDFCreator\Program\PrinterTemppath
“PrinterTemppath”=”<temp>PDFCreator\”
Changed the value to “C:\PDFCreator\”
Change also:
HKEY_USERS\.DEFAULT\Software\PDFCreator\Program\
“PrinterTemppath”=”<temp>PDFCreator\
Changed the value to “C:\PDFCreator\”
Then create a folder on c:\ with the name of PDFCreator, and set security so that all yours terminal servers users have modify access to this folders.
Windows 7 / Office 2010 get serial key from registry
For personale use only, use this programs:
http://kennethdalbjerg.dk/wp-content/uploads/2012/02/siw-setup.exe
With this programs you can get the Serial key from you installed Windows 7 or Office 2010:
http://kennethdalbjerg.dk/wp-content/uploads/2012/02/produkey.zip
The product is code by:
ProduKey v1.53
Copyright (c) 2005 – 2011 Nir Sofer
Web Site: http://www.nirsoft.net/utils/product_cd_key_viewer.html
It can get the serial for this products:
* Microsoft Windows 98/ME
* Microsoft Windows 2000
* Microsoft Windows NT
* Microsoft Windows XP
* Microsoft Windows Vista
* Microsoft Windows Server 2003
* Microsoft Windows 7 (Works only for some of the Windows 7 versions,
see the known problems section)
* Microsoft Office 2000 (Only ProductID is displayed)
* Microsoft Office 2003
* Microsoft Office 2007
* Microsoft Office 2010
* Microsoft SQL Server 2000
* Microsoft SQL Server 2005
* Microsoft Exchange Server 2000
* Microsoft Exchange Server 2003
Known Problems
==============
* When running produkey.exe, Some Antivirus programs displays an alert
and/or block you from running it. Click here to read more about false
alerts in Antivirus programs
* For some Windows 7/2008 licenses, the product key is not stored in
the Registry, and thus ProduKey cannot retrieve them. In these cases,
ProduKey will display ‘Product key was not found’ in the product key
column.
* If you bought your computer with installed operating system, you may
find the Windows product key appeared in ProduKey utility is different
from the product key on your Windows CD. This problem is mostly
reported with Dell computers.
* From unknown reason, the product key of Visual Stuido .NET is written
in the Registry as Office XP product…
* In old versions of Office (Office 2000 and below), the ‘Product Key’
value is not available.
Xencenter / Xenserver This operation cannot be performed because the specified VDI could not be found on the storage substrate
Today i got this when i was trying to start a VDI on my Xenceter.
This operation cannot be performed because the specified VDI could not be found on the storage substrate
This was because of that i have a CDrom mounted on a CIFS shares that isn’t available anymore, after remove the ISO, the VDI start perfects again.
Failed to import the OVF Package. Xenserver / Xenconvert
I have a problem converting a VHD to a virtual machine to an Xenserver.
When lokking at the logs i got this: Failed to import the OVF Package.
It was because my Default Storage was fill.
When change the Default storage at my XenCenter it was working fine again.
First change the show to “Folder View”
Select Types.

Then select a storage ether under Remote Storage Repositories or Local Storage Repositories.
Right click on it and set it as default.
Citrix XenDesktop (5) VDI network Ports TCP / UDP
| From / TO | Ports |
| User machine / Web Interface | tcp/80 |
| User machine / VDI | tcp/1494 tcp/3389 |
Cisco ASA get Site 2 Site VPN PSK – decrypt PSK S2S VPN
If you only see asterisks, in the ASA configuration of you ASA when you want to find the PSK of a Site2Site (S2S)VPN, you can type this command:
more system:/running-config
then it will show the PSK in clear text.
Get number of all desktops in Citrx Xendesktop with powershell in all desktop groups
To get sum of all desktops in the Citrix Xendesktop (5) farm, just run this commands:
Asnp Citrix.*

Get-BrokerDesktopGroup | measure-object -property TotalDesktops -sum | select sum


